Cluster Lifecycle Management
Feature Introduction
Installation and deployment, as the starting point of the PAAS platform business, is an important part of measuring product capabilities. The tool uses a Cluster-API based approach to implement system installation and deployment, using K8s declarative API style to manage its own multi-K8s clusters, simplifying K8s cluster lifecycle management, optimizing cluster installation processes and management details, and making the installation process more automated. This document introduces business cluster installation guidance after installing the management cluster and cluster lifecycle management operations.
Application Scenarios
Users use the installation and deployment tool to create the openFuyao management plane and cluster, completing container platform installation and deployment.
Capability Scope
Perform installation and deployment of the entire container platform, supporting cluster lifecycle management of business clusters, including creation, deletion, scale-out, scale-in, and upgrade of business clusters.
Key Features
Based on the Cluster-API approach, using K8s declarative API style to manage its own multi-K8s clusters, simplifying K8s cluster lifecycle management and making the installation process more automated.
Implementation Principle
- Overall Process
Download the BKE installation tool and perform bootstrap node initialization.
The bootstrap node pushes Agent to management cluster nodes, deploys the K8s cluster and Cluster-API, completing management cluster creation.
Complete creation, uninstallation, dynamic scale-out/scale-in, and K8s version upgrade of business clusters on the openFuyao management plane (including dynamic scale-out/scale-in of the management cluster itself).
Note:
- The bootstrap node is responsible for building the management cluster, the management cluster is responsible for building business clusters, and business clusters are responsible for running customer programs.
- In the current installation and deployment tool, bootstrap node initialization and bootstrap node management cluster setup are executed by users through the command line, while management cluster creation of business clusters is managed through the openFuyao cluster lifecycle management interface on the management cluster.
Figure 1 Installation and Deployment Flowchart
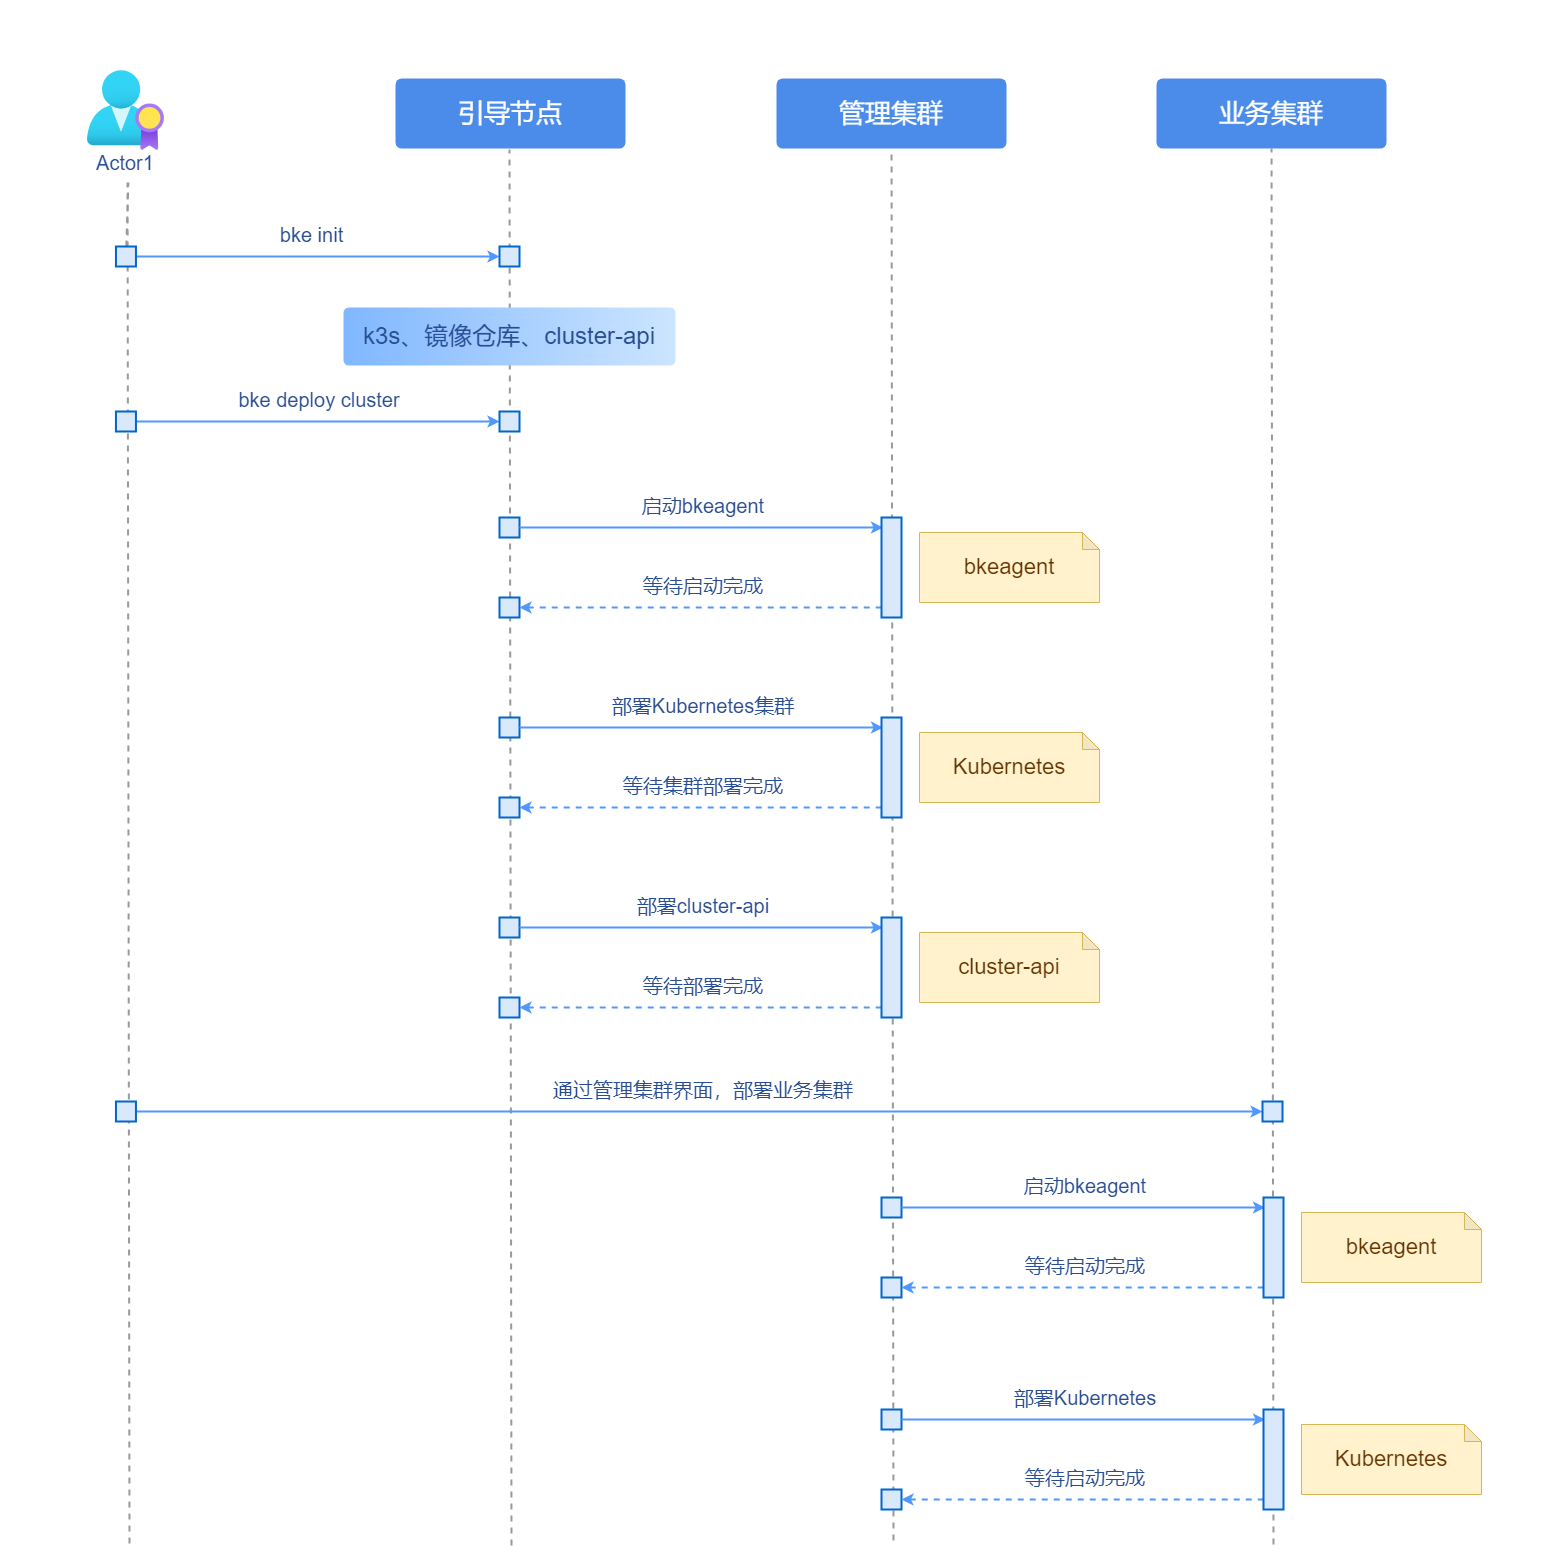
The BKE components involved in the diagram consist of bkeadm, bkeagent, and cluster-api, specifically introduced as follows:
- bkeadm
Only used as a binary file on the bootstrap node, it is the BKE installation tool. Main functions include: starting image registry and yaml registry, starting K3s cluster and installing cluster-api, submitting management cluster configuration.
- bkeagent
A cloud-native host management tool responsible for listening to kube-apiserver instructions and executing them on the host. Main functions include: listening to CRD resources, reporting execution results; providing the capability to switch listening K8s clusters; built-in multiple tasks, such as: node environment check, docker installation, shell script execution, etc.
- cluster-api
A controller with main functions including: distributing and starting bkeagent on all nodes; creating instructions to command bkeagent work; aggregating various deployment cluster results and updating them to bkecluster events.
Figure 2 System Logical View
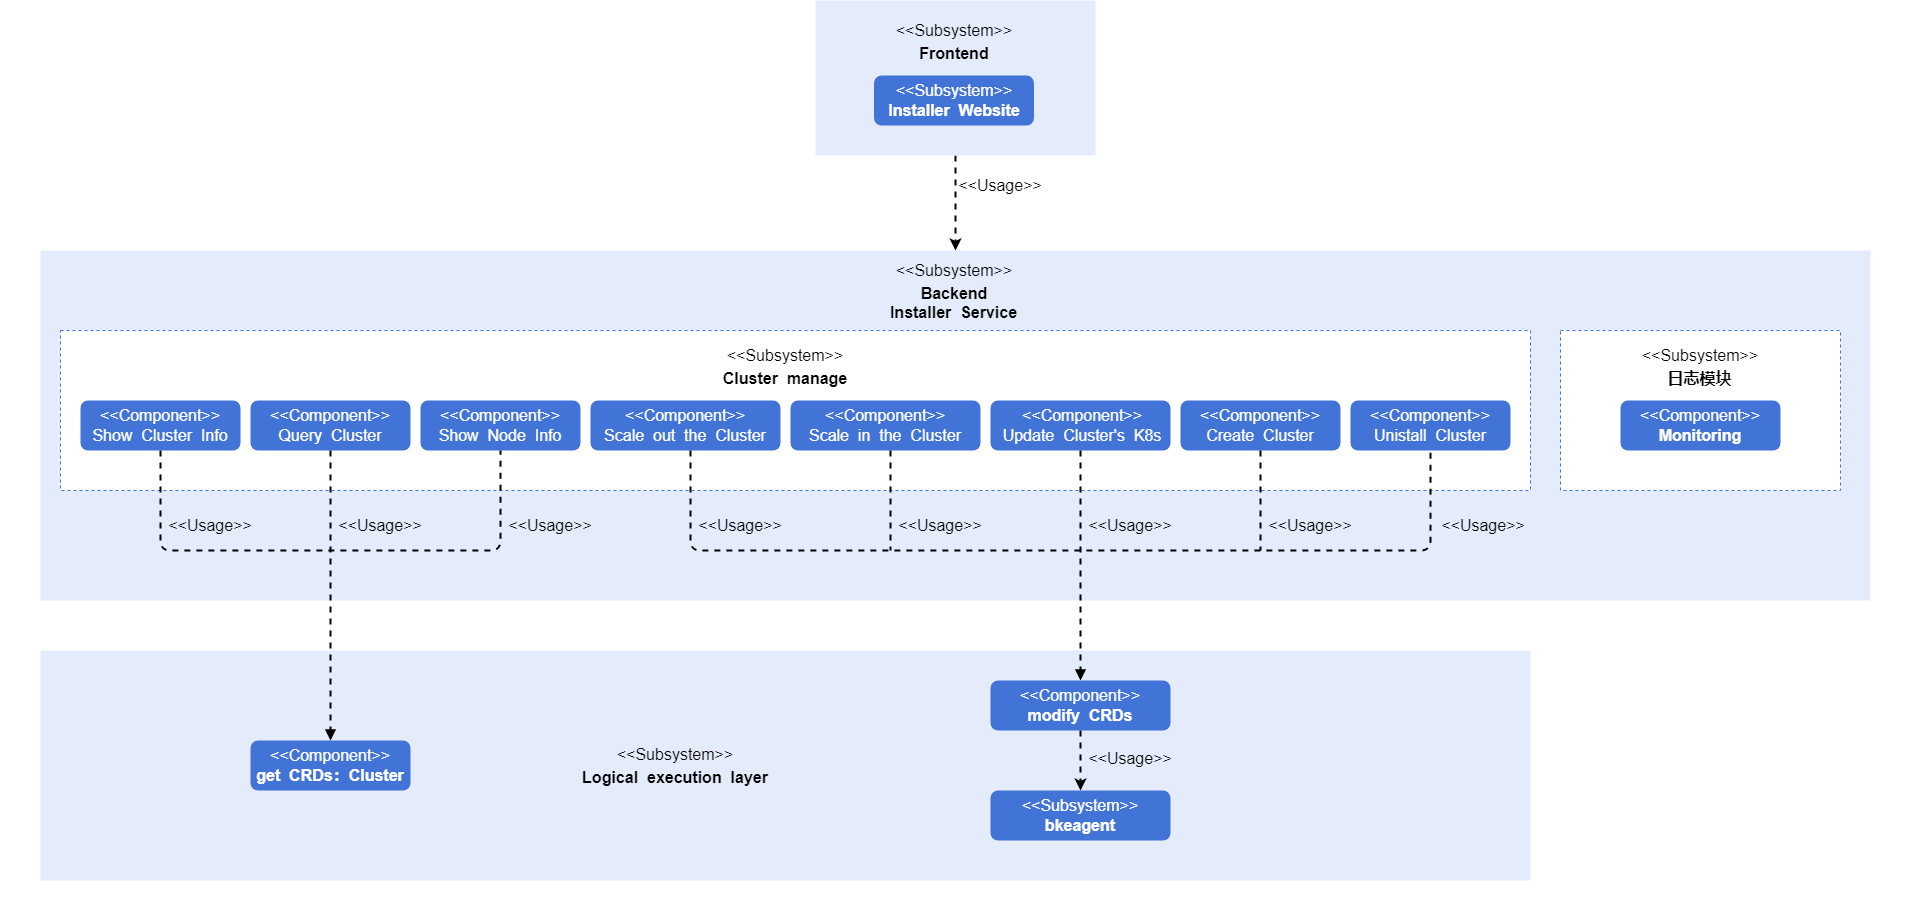
After the frontend modifies and fills in cluster configuration options, the configuration file is submitted to the backend for processing, APIs are called, and submitted to the corresponding K8s APIserver for cluster management action execution.
Relationship with Related Features
None.
Related Examples
Code links:
https://gitcode.com/openfuyao/installer-website
https://gitcode.com/openfuyao/installer-service
Installation
Overall installation is divided into management cluster installation and business cluster installation. Detailed installation content for the management cluster can be found in Online Installation and Offline Installation. Business cluster installation can be found in the following sections.
Logging into the openFuyao Management Plane
Enter "https://bootstrap node login IP address:cluster lifecycle management web service port" in the browser, enter the username and password to log into the cluster lifecycle management page.
- Password must be changed on first login.
- The cluster lifecycle management web service port defaults to 30010.
Adding a Cluster
The following introduces adding cluster operations.
Prerequisites
Bootstrap node has been configured.
Management cluster installation is complete.
Background
Create business clusters on the cluster lifecycle management page.
Restrictions
Need to confirm correct node IP address, username, and password.
High availability cluster creation requires confirming the correct load balancer IP address.
Procedure
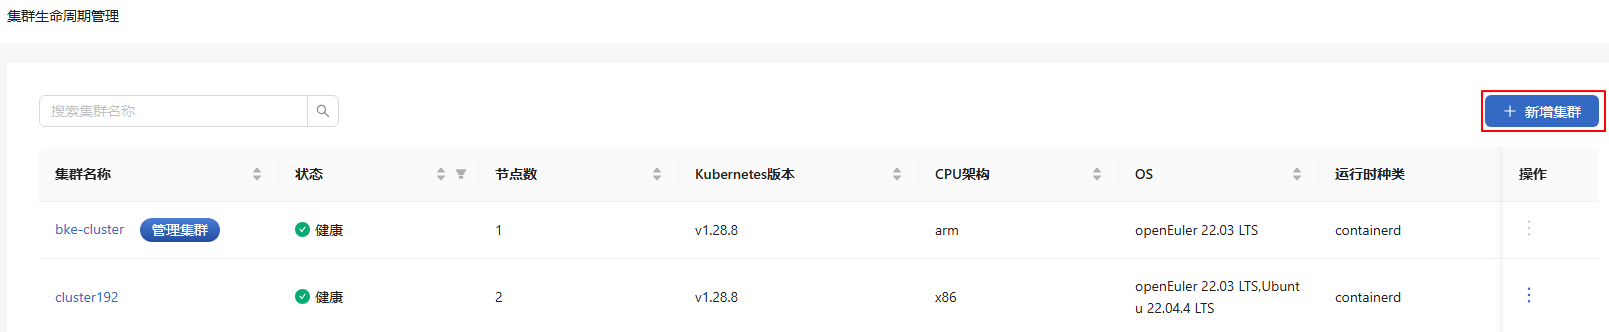
Select "Cluster Lifecycle Management" in the left navigation bar of the openFuyao platform. The interface displays cluster lifecycle management list information, including "Cluster Name", "Status", "Node Count", etc.
Click "+ Add Cluster" in the upper right of the list to enter the "Add Cluster" interface.
Figure 3 Add Cluster
Fill in the interface content.
Table 1 Interface Content Description
| Area Name | Description |
|---|---|
| Basic Information | Create a name for the cluster. |
| Master Information | Control plane node related information for the business cluster. Click  to continue adding control plane nodes. Click the to continue adding control plane nodes. Click the  icon in the "Action" column to delete added nodes. icon in the "Action" column to delete added nodes. |
| Node Information | Node information for business cluster nodes. |
| Advanced Configuration | Defaults to configured image registry address and image registry IP address, as well as Chart repository address. For online installation, the default address is the online default repository address; for offline installation, the default address is the bootstrap node address configured during offline installation. |
Click "Create" below, a "Cluster Information" dialog box appears.
After the cluster information scrolls to completion, click "OK".
Return to the list interface, the "Status" column displays "Installing".
After the "Status" column field updates, adding cluster is complete.
If "Cluster Information" displays error information, further diagnosis and resolution is needed.
Deleting a Cluster
The following introduces deleting cluster operations.
Prerequisites
Created clusters exist in the cluster lifecycle management list interface.
Background
Delete business clusters on the cluster lifecycle management page.
Restrictions
Currently only supports deletion of successfully created clusters. Failed creation clusters need to be troubleshot first, then manually deleted by logging into each node of the cluster. Manual deletion steps are as follows:
Download and automatically install bkeadm on each node of the cluster.
bash# Method 1: Quick download curl -sfL https://openfuyao.obs.cn-north-4.myhuaweicloud.com/openFuyao/bkeadm/releases/download/1.2.2/download.sh | bashbash# Method 2: Verify complete download of files ## Download download.sh script file curl -LO https://openfuyao.obs.cn-north-4.myhuaweicloud.com/openFuyao/bkeadm/releases/download/1.2.2/download.sh ## Download download.sh file checksum file and verify (optional), successful verification outputs -: OK, failed verification requires contacting openFuyao community maintainers to investigate curl -LO https://openfuyao.obs.cn-north-4.myhuaweicloud.com/openFuyao/bkeadm/releases/download/1.2.2/download.sh.sha256 sha256sum -c <(cat download.sh.sha256) < download.sh ## Run download.sh file to download bke installation tool, checksum of installation tool will be verified during execution chmod +x download.sh && ./download.shExecute configuration initialization.
bashbke reset --all --mountNote: Currently bke reset operation may leave residual container mount paths, use df -h to check for overlay items, if they exist try bke reset uninstall again, or reboot to delete.
Delete BKE files.
bashrm -rf /bke which bke | xargs rm -rf
Procedure
In the "Cluster Lifecycle Management" list interface, click
 in the "Action" column and select "Delete".
In the dialog box, check "Understood that this deletion is a deep deletion and cannot be undone."
Click "Delete", the interface prompts "Deleting, will take some time please wait patiently", the "Status" column displays "Deleting".
After the cluster information is cleared from the list, the cluster deletion operation is complete.
Deletion time is generally 10 to 20 minutes, specific time depends on network conditions.
Upgrading a Cluster
The following introduces upgrading cluster operations.
Prerequisites
Created clusters exist in the cluster lifecycle management list interface.
Background
Perform in-place K8s upgrade of business clusters on the cluster lifecycle management page.
Restrictions
Only supports upgrading K8s versions to higher versions, does not support K8s version rollback.
The default installed K8s version for the current version is v1.28.8, supports upgrading to v1.29.1.
Precautions
Upgrade is an irreversible operation, please operate carefully.
When upgrading a cluster, ensure the cluster is in healthy status. During upgrade, no operations on the cluster are recommended.
Upgrade is in-place, business is temporarily unavailable during the upgrade process.
Procedure
Entry 1: In the "Cluster Lifecycle Management" list interface, click
in the "Action" column and select "Upgrade".Entry 2: In the "Cluster Details" interface upper right corner, click "Upgrade Cluster".
The "Upgrade Cluster" window appears, select the upgrade version from the dropdown.
Confirm information is correct, click "OK". Automatically returns to the list interface and the "Status" column displays "Upgrading", after the "Status" column updates, cluster upgrade is complete.
After completing the upgrade operation, you can see the current cluster's latest K8s version in the "Kubernetes Version" column of the cluster list interface.
Scaling Out a Cluster
The following introduces scaling out cluster operations.
Prerequisites
Business cluster has been successfully created on the cluster lifecycle management page, and the cluster status is "Healthy".
Background
Scale out business clusters on the cluster lifecycle management page.
Restrictions
When scaling out a cluster, users need to ensure the nodes used are unused. When scaling out, only node nodes can be added.
Procedure
- In the "Cluster Lifecycle Management" list interface, click any "Cluster Name" to enter the "Node Details" interface.
Node list information in the node details interface is arranged with control plane nodes first, followed by worker nodes.
- In the upper right of the list information, click "+ Add Node".
Set new nodes are all worker nodes.
- Fill in the dialog box information, such as "Node Name", "Port", "IP Address", "Username", and "Password".
Click
to continue adding nodes.Click the
in the "Action" column to delete added nodes.
When complete, click "Next".
The interface displays the "Cluster Information" window, after scrolling to completion click "OK", returns to the cluster lifecycle management list interface, and the corresponding cluster's "Status" column is "Installing".
After the corresponding cluster's "Status" column updates, cluster scale-out is complete.
- Scale-out failed: corresponding cluster's "Status" column is "Installation Failed".
- Scale-out successful: corresponding cluster's "Status" column is "Healthy".
Before successful scale-out, the cluster is not stable, please do not perform other operations on the cluster.
Scaling In a Cluster
The following introduces scaling in cluster operations.
Prerequisites
Business cluster has been successfully created on the cluster lifecycle management page, and the cluster status is "Healthy".
Background
Scale in business clusters on the cluster lifecycle management page.
Restrictions
When scaling in a cluster, only supports deleting worker nodes, and deleted nodes cannot be recovered, please operate carefully.
Procedure
In the "Cluster Lifecycle Management" list interface, click any "Cluster Name" to enter the "Node Details" interface.
Select deletion method.
- Batch Delete
Click the checkbox before "Node Name" to select nodes to delete.
Click "Delete" above the list.
- Single Delete
Select the node to delete.
Click the
icon in the "Action" column.In the dialog box, check "Understood that this deletion cannot be undone".
Click "Delete" in the dialog box to complete deletion of the selected node.
Status Description
During cluster operations (installation, scale-out, upgrade), the status changes displayed in the cluster "Status" column on the page.
Installation
During installation, the overall status flow changes as follows:
When a cluster has only 1 worker node, the overall status changes are: Installing, Abnormal, Healthy.
When a cluster has multiple worker nodes, the overall status changes are: Installing, Scaling Out, Abnormal, Healthy.
Scale-out
During cluster scale-out, the overall status changes are: Installing, Scaling Out, Abnormal, Healthy.
Upgrade
During cluster upgrade, the overall status changes are: Upgrading, Abnormal, Healthy.
Actual Actions for Each "Status"
Table 2 Status and Description
| Status | Description |
|---|---|
| Installing | Node environment preparation, ClusterAPI docking, cluster certificate creation, cluster entry configuration, control plane node initialization and joining. |
| Scaling Out | Worker nodes joining the cluster. |
| Upgrading | Control plane nodes and worker nodes upgrading. |
| Abnormal | During installation, scale-out, upgrade processes, cluster health check was performed, Pods are not all ready. |
| Healthy | Cluster is in healthy status. |
Licensed under the MulanPSL2
 YueGongWangAnBei No.44030002007300