Authentication and Authorization Development Guide
Feature Introduction
openFuyao platform provides unified user login authentication service, supporting standard OAuth2.0 login flow. Current version uses internal account password identity provider to perform user authentication and authorization. Future versions will introduce third-party authentication providers to achieve user automatic access. After logging in to openFuyao platform, user access to specific resources of Kubernetes APIServer and access to components within openFuyao system depend on Kubernetes RBAC authorization mechanism.
In addition, openFuyao can conveniently integrate developers' own developed frontend and backend applications through general easy-to-extend architecture. If developers want to integrate their own developed applications into openFuyao's entire authentication and authorization system, they can use oauth-proxy component to implement it. As a sidecar container, it will first intercept requests sent to user's frontend application, and only allow access to user's frontend application after successfully performing OAuth2.0 (Open Authorization 2.0) authentication and RBAC (Role-Based Access Control) authorization, thereby completing authentication and authorization of extension components.
User basic login authentication
- Initial password is generated after one-click installation and deployment.
- First login requires password modification.
- User modifies password, user logs out.
User authorization
- Access to Kubernetes resources is authorized by delegating to Kubernetes APIServer for RBAC authorization.
- Access to component permissions is authorized by oauth-proxy proxy to Kubernetes APIServer for RBAC authorization.
Security verification
- User is locked when multiple login failures occur to prevent brute force attacks.
- User authorization step in OAuth2.0 authentication uses csrf_token verification to prevent cross-site request forgery attacks.
Extension components
- Can access openFuyao's OAuth2.0 authentication flow.
- Can access Kubernetes RBAC authorization based on abstracted user Role using this component.
Constraints and Limitations
Current version does not support other identity providers (github) intervening in OAuth2.0 authentication process, can only use built-in fuyaoPasswordProvider identity provider.
Environment Preparation
Authentication and authorization system is installed and deployed together with platform. For detailed steps, please refer to Installation Guide.
Integrating Extension Components into openFuyao Authentication System
Task Scenario Overview
When users develop an extension component's frontend and backend themselves, they will integrate it into openFuyao management interface through openFuyao's extension framework. If users want users accessing this extension component to have specific permissions at this time, they need to introduce authentication and authorization component oauth-proxy to help extension frontend access openFuyao's authentication and authorization system, thereby filtering out users without permissions and protecting user's upstream application.
System Architecture
From deployment perspective, in order to integrate extension component's frontend into authentication and authorization system, we will add oauth-proxy sidecar container to extension component's frontend pod. It will intercept requests sent to extension component frontend and perform authentication verification. After authentication passes, it will also delegate to KubeAPIServer for authorization through SubjectAccessReview, and only then forward requests to extension component frontend inside pod.
Figure 1 Extension Component Integration into openFuyao Authentication and Authorization System Flow Diagram
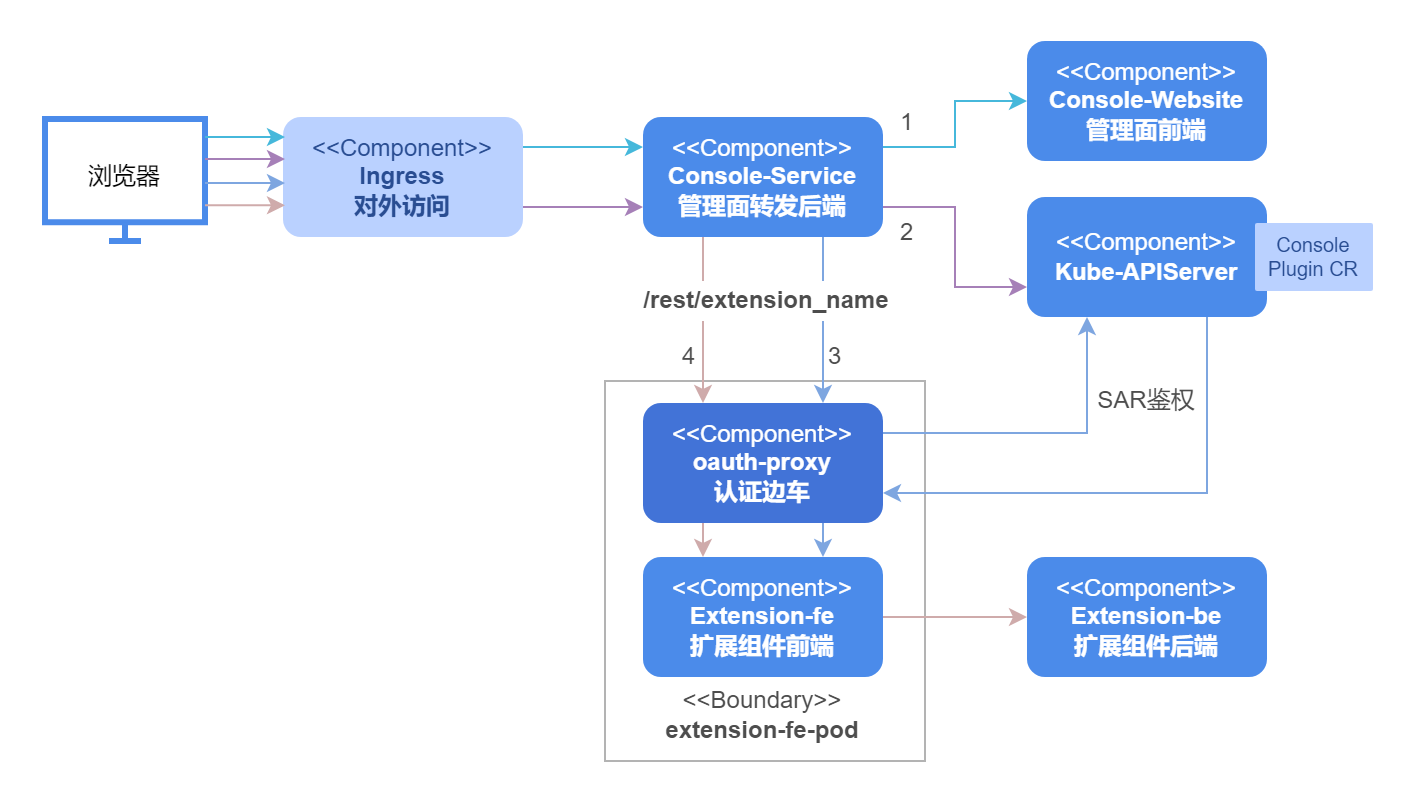
The entire integration process shown in Figure 1 can be decomposed into following four steps.
- Line 1 represents browser accessing openfuyao management interface's frontend display interface basic information, javascript on interface will request ConsolePlugin CRD mounted in current cluster.
- Line 2 represents processing process of requesting ConsolePlugin CRD, Console-Service will forward to APIServer to get all CRs and return to browser.
- Line 3 represents browser obtaining mount information and extension prefix, forwarding requests to oauth-proxy sidecar in extension component frontend pod through Console-Service's extension routing. oauth-proxy will parse user token to obtain user information, then delegate to kube-apiserver for authorization before being able to access extension component frontend page, return to browser.
- Line 4 represents frontend obtaining browser extension component's backend through javascript, similarly forwarding to oauth-proxy sidecar through Console-Service's extension routing. After authentication and authorization pass, forward to extension component frontend service, which internally forwards to backend service through configured nginx.conf.
Development Process
Only need to modify configuration file, no detailed development process required.
Interface Description
Only need to modify configuration file, no need to introduce interfaces.
Development Steps
Here taking log component as example to explain complete process of integrating extension component into openFuyao authentication system.
Note:
Following configurations can be performed through values.yaml in oauth-proxy's helm template. Configuration items involved are shown as follows.
# values.yaml
......
service:
  containerPort: 9039  # Business container's containerPort, i.e., port opened by container internal http server
  backend: "http://logging-operator.openfuyao-system.svc" # Extension component backend url
  enableOAuth: true   # Whether to enable oauth-proxy
oauthProxy:
  containerPort: 9093
  image:
    repository: "cr.openfuyao.cn/openfuyao/oauth-proxy"
    pullPolicy: Always
    tag: "v24.09"
  client:
    id: "oauth-proxy"
    secret: "SECRETTS"
  urls:
    host: "/"
    loginURI: "/oauth2/oauth/authorize"
    redeemURI: "/oauth2/oauth/token"
    rootPrefix: "/logging" # Fill in extension component consolePlugin CR's .spec.pluginName
Original deployment file preparation.
Extension component is installed by Helm. Normally there will be two Helm packages corresponding to extension component's frontend and backend respectively. And extension component's backend services belong to cluster. All external calls will first pass through extension component's frontend proxy and be sent to extension component's backend. Therefore, our authentication only needs to be added to extension component's frontend to filter all requests accessing extension component on page. Here taking log extension component as example to explain files that need to be prepared.
yaml# Source: logging/templates/consoleplugin.yaml apiVersion: console.openfuyao.com/v1beta1 kind: ConsolePlugin metadata: name: logging spec: pluginName: logging # Name of this extension component, needs to be set, will be used when configuring Ingress later displayName: "Logs" subPages: - pageName: logSearch displayName: "Log Query" - pageName: logSet displayName: "Log Configuration" entrypoint: /container_platform backend: type: Service service: name: logging # {{ .Release.Name }} namespace: openfuyao-system # {{ .Release.Namespace }} port: 80 # {{ .Values.service.httpPort }} enabled: true --- # Source: logging/templates/fe-deployment.yaml apiVersion: apps/v1 kind: Deployment metadata: name: logging namespace: openfuyao-system labels: app: logging spec: replicas: 1 selector: matchLabels: app: logging template: metadata: labels: app: logging spec: containers: - name: frontend image: "cr.openfuyao.cn/openfuyao/logging-website:v24.09" imagePullPolicy: Always ports: - name: http containerPort: 80 protocol: TCP volumeMounts: - name: host-time mountPath: /etc/localtime readOnly: true - name: nginx-config mountPath: /etc/nginx/nginx.conf subPath: nginx.conf volumes: - name: host-time hostPath: path: /etc/localtime type: "" - name: nginx-config configMap: defaultMode: 0600 name: logging-nginx items: - key: nginx.conf path: nginx.conf --- # Source: logging/templates/fe-service.yaml apiVersion: v1 kind: Service metadata: name: logging namespace: openfuyao-system labels: app: logging spec: type: ClusterIP ports: - port: 80 # {{ .Values.service.httpPort }} targetPort: 8080 # {{ .Values.service.containerPort }} selector: app: logging --- # Source: logging/templates/fe-config.yaml apiVersion: v1 kind: ConfigMap metadata: name: logging-nginx namespace: openfuyao-system data: nginx.conf: | worker_processes auto; error_log /var/log/nginx/error.log notice; pid /tmp/nginx.pid; events { worker_connections 1024; } http { proxy_temp_path /tmp/proxy_temp; client_body_temp_path /tmp/client_temp; fastcgi_temp_path /tmp/fastcgi_temp; uwsgi_temp_path /tmp/uwsgi_temp; scgi_temp_path /tmp/scgi_temp; include /etc/nginx/mime.types; default_type application/octet-stream; log_format main '$remote_addr - $remote_user [$time_local] "$request" ' '$status $body_bytes_sent "$http_referer" ' '"$http_user_agent" "$http_x_forwarded_for"'; access_log /var/log/nginx/access.log main; sendfile on; #tcp_nopush on; gzip on; gzip_min_length 10k; gzip_buffers 4 32k; gzip_http_version 1.1; gzip_comp_level 6; gzip_types text/plain text/css text/html text/xml text/javascript application/json application/x-javascript application/xml application/xml+rss application/javascript font/ttf font/woff font/woff2 image/png image/svg+xml video/mp4; gzip_vary on; client_body_timeout 10; client_header_timeout 10; keepalive_timeout 5 30; send_timeout 10; port_in_redirect off; limit_conn_zone $binary_remote_addr zone=limitperip:10m; limit_req_zone $binary_remote_addr zone=ratelimit:10m rate=5r/s; server_tokens off; autoindex off; server { listen 8080 default_server; root /usr/share/nginx/html/; index index.html index.htm; client_header_buffer_size 5k; large_client_header_buffers 4 16k; client_body_buffer_size 10m; client_max_body_size 256m; add_header Content-Security-Policy "connect-src 'self' https:;frame-ancestors 'none';object-src 'none'" always; add_header Cache-Control "no-cache, no-store, must-revalidate" always; add_header X-Frame-Options DENY always; add_header X-Content-Type-Options nosniff always; add_header X-XSS-Protection 1 always; add_header Strict-Transport-Security "max-age=31536000" always; limit_conn limitperip 10; location / { try_files $uri /index.html; } location ~* ^/logging/.*\.(js|cjs|mjs)$ { default_type text/javascript; rewrite ^ /dist/logging.mjs break; } location /logging/ { rewrite ^/logging(/.*)$ $1 break; proxy_pass {{ .Values.backend }}; } location ~* \.(js|cjs|mjs)$ { default_type text/javascript; } location /rest/logging { proxy_pass {{ .Values.backend }}; } } }The above four yaml files are needed for deploying extension component frontend. Among them,
.spec.pluginNamein custom resource ConsolePlugin needs to be set to name of this extension component, will be used when Console-Service performs forwarding later. fe-service.yaml and fe-deployment.yaml are extension component frontend's service and deployment resources respectively, oauth-proxy resources will be added later to complete authentication and authorization integration. fe-config.yaml contains extension component frontend nginx configuration items, responsible for forwarding requests to extension component backend.Configure Service.
yaml# Source: proxy-logging/templates/fe-service.yaml apiVersion: v1 kind: Service metadata: name: logging namespace: openfuyao-system labels: app: logging spec: type: ClusterIP ports: - port: 80 # {{ .Values.service.httpPort }} targetPort: proxy # Modified from http to proxy selector: app: loggingWhen configuring Service, change original port 8080 pointing to extension component frontend container to port name proxy pointing to oauth-proxy container. Proxy corresponding port number can be configured through
{{ .Values.oauthProxy.containerPort }}. After this, external access to this extension component Pod will first be intercepted by oauth-proxy sidecar, and then after authentication passes, sent to original extension component container's port through Pod internal localhost communication.Configure ServiceAccount and related Role/RoleBinding.
yaml# Source: proxy-logging/templates/serviceaccount-rolebindings.yaml # RBAC authn and authz apiVersion: v1 kind: ServiceAccount metadata: name: logging-oauth-proxy namespace: openfuyao-system --- # Source: proxy-logging/templates/serviceaccount-rolebindings.yaml kind: ClusterRoleBinding apiVersion: rbac.authorization.k8s.io/v1 metadata: name: logging-oauth-proxy-webhook-auth subjects: - kind: ServiceAccount name: logging-oauth-proxy namespace: openfuyao-system roleRef: kind: ClusterRole name: webhook-auth apiGroup: rbac.authorization.k8s.ioIn above configuration files:
- Files corresponding to serviceaccount-rolebindings.yaml in helm can be used directly, templates contained are configured in values.yaml according to project requirements.
- logging-oauth-proxy: Service account used by oauth-proxy, below will bind this service account to some roles granting it certain permissions to enable it to perform authentication API calls.
- logging-oauth-proxy-webhook-auth: A cluster role binding of oauth-proxy, granting oauth-proxy permissions to call authentication and authorization webhooks in Kubernetes APIServer. Corresponding ClusterRole has already been created when oauth-server was installed, no need to create duplicate here.
If ServiceAccount is already bound in Deployment corresponding to frontend service, then logging-oauth-proxy this ServiceAccount does not need to be created, in logging-oauth-proxy-webhook-auth this ClusterRoleBinding's subjects corresponding name just fill in already bound ServiceAccount.
Configure Deployment.
Note:
After users complete first 3 steps, step 4 only needs to directly copy and paste content between{{- if .Values.enableOAuth }}...{{- end }}to corresponding position.Since oauth-proxy is added to original extension component frontend's Pod in form of sidecar, here in fe-deployment.yaml we will additionally add an oauth-proxy container deployment, specific form is as follows.
yaml# Source: proxy-logging/templates/fe-deployment.yaml apiVersion: apps/v1 kind: Deployment metadata: name: logging namespace: openfuyao-system labels: app: logging spec: replicas: 1 selector: matchLabels: app: logging template: metadata: labels: app: logging spec: serviceAccountName: logging-oauth-proxy # If original Deployment file does not have this item, use ServiceAccount created in step 2 containers: - name: logging image: "cr.openfuyao.cn/openfuyao/logging-website:v24.09" # Extension component frontend container imagePullPolicy: Always ports: - name: http containerPort: 80 protocol: TCP # Add oauth-proxy image {{- if .Values.enableOAuth }} - name: oauth-proxy image: "{{ .Values.oauthProxy.image.repository }}:{{ .Values.oauthProxy.image.tag }}" imagePullPolicy: {{ .Values.oauthProxy.image.pullPolicy }} ports: - containerPort: {{ .Values.oauthProxy.containerPort }} name: proxy args: - --https-address= - '--http-address=:{{ .Values.oauthProxy.containerPort }}' - --email-domain=* - --provider=openfuyao - --client-id={{ .Values.oauthProxy.client.id }} - --client-secret={{ .Values.oauthProxy.client.secret }} - '--upstream=http://localhost:{{ .Values.service.containerPort }}' - '--openfuyao-delegate-urls={"/":{"resource": "services/proxy", "group": ""}}' - --redirect-url={{ .Values.oauthProxy.urls.host }} - --login-url={{ .Values.oauthProxy.urls.loginURI }} - --redeem-url={{ .Values.oauthProxy.urls.redeemURI }} - --root-prefix={{ .Values.oauthProxy.urls.rootPrefix }} - --cookie-httponly {{- end }} volumes: - name: host-time hostPath: path: /etc/localtime type: "" - name: nginx-config configMap: defaultMode: 0600 name: logging-nginx items: - key: nginx.conf path: nginx.conf
Testing and Verification
None.
Licensed under the MulanPSL2
 YueGongWangAnBei No.44030002007300