KubeVirt
Feature Introduction
KubeVirt is an open-source project sponsored by the Cloud Native Computing Foundation (CNCF) and serves as the core foundation of Red Hat OpenShift virtualization technology. It aims to seamlessly integrate traditional Virtual Machine (VM) workloads into the Kubernetes ecosystem. Through KubeVirt, users can manage both containerized applications and traditional VMs within the same Kubernetes cluster. VMs are encapsulated in containers for execution, preserving the compatibility and isolation of traditional virtualization while leveraging cloud-native capabilities provided by Kubernetes, such as orchestration, scheduling, network policies, and declarative APIs. This enables enterprises to smoothly migrate and run legacy applications on a unified hybrid cloud platform.
Application Scenarios
Edge Computing: In edge computing scenarios, there are often both newly developed cloud-native applications and traditional services that are difficult to containerize. KubeVirt allows both types of workloads to run uniformly within an edge Kubernetes cluster. For example: IoT edge nodes can use KubeVirt to deploy VM-based legacy operating system services while allowing those services to share underlying network and storage resources with containerized microservices, reducing hardware costs and simplifying management.
Hybrid Cloud and Private Cloud: KubeVirt enables Kubernetes to serve as a unified hybrid cloud control plane. By deploying a Kubernetes cluster integrated with KubeVirt on bare-metal servers, enterprises can achieve unified management, scheduling, and operations for both VMs and containers, breaking down the silos between virtualization and containerization.
Capability Scope
- Architecture Support: Supports creating ARM64 architecture VMs through declarative CRD (Custom Resource Definition) approach.
- Lifecycle Management: Provides complete basic VM lifecycle management capabilities, including creation, deletion, startup, shutdown, and state synchronization.
- Kunpeng Adaptation: Supports running virtualization workloads on Kunpeng node environments.
Highlight Features
- ARM64 Native Support: Provides stable virtualization foundational capabilities on Kunpeng and other ARM64 servers.
- Unified Management: Brings VMs under the K8s management framework, enabling "deploy once, manage everywhere".
- Cloud-Native Feature Inheritance: VMs can reuse K8s network plugins (CNI), storage plugins (CSI), and scheduling policies.
Implementation Principle
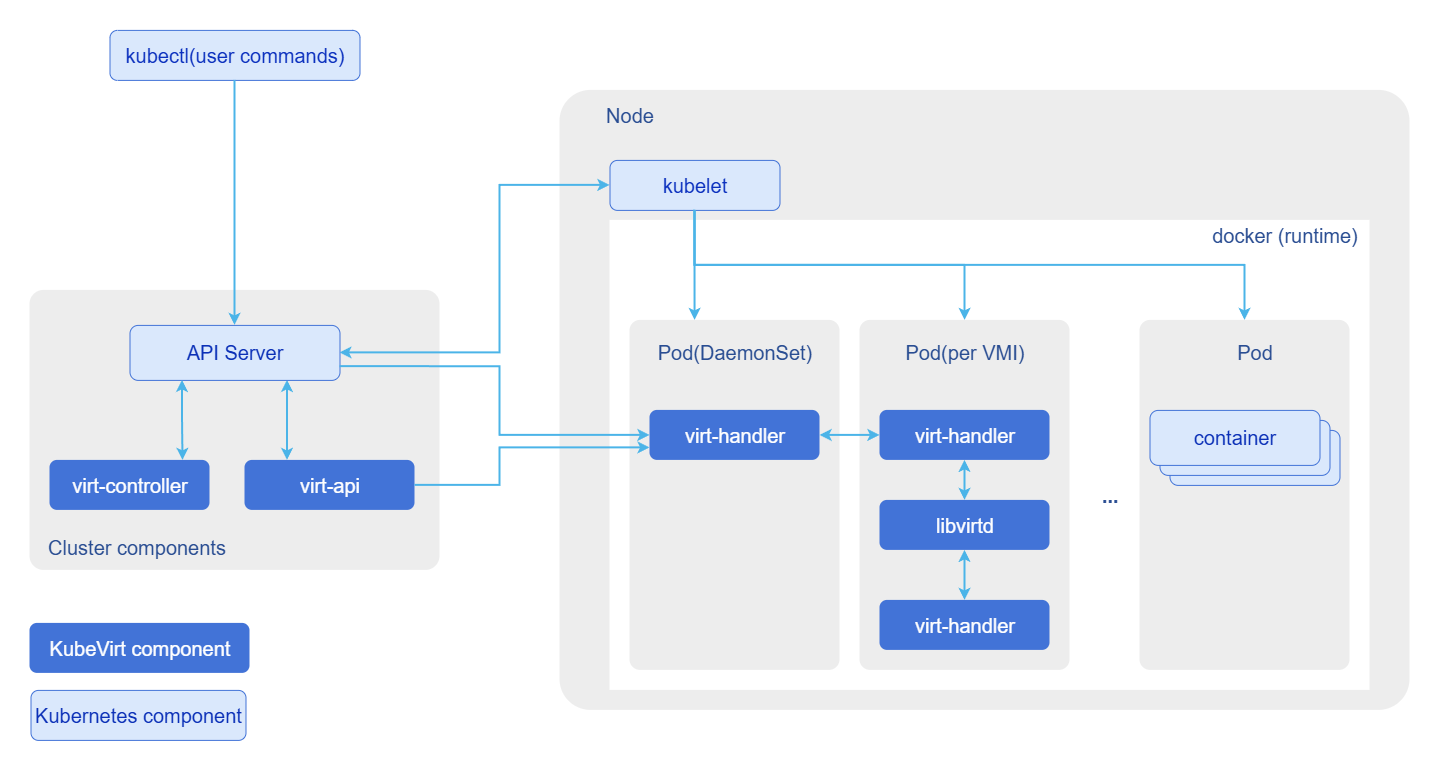
KubeVirt manages VMs by extending the Kubernetes API. Its core components are deployed in the kubevirt namespace, as shown in Figure 1.
Figure 1 KubeVirt Interaction View
Core Components Description
KubeVirt introduces a set of new CRD resources and core controller components:
New CRD Resources
- VirtualMachine(VM): A high-level resource object used to define the desired state of a VM (such as running, stopped) and configuration changes. Similar to Deployment in K8s.
- VirtualMachineInstance(VMI): Represents an actually running VM instance. Similar to Pod in K8s, it is the basic unit for scheduling and execution.
- VirtualMachineInstanceReplicaSet: Similar to ReplicaSet for Pods, used for batch management and maintaining the quantity of homogeneous VM instances.
Core Runtime Components
- virt-api: Serves as the extension entry point for the Kubernetes API. It registers CRDs and exposes VM operation interfaces (such as start, stop, migrate, console, vnc, etc.) through the Aggregator mechanism, handling user REST requests.
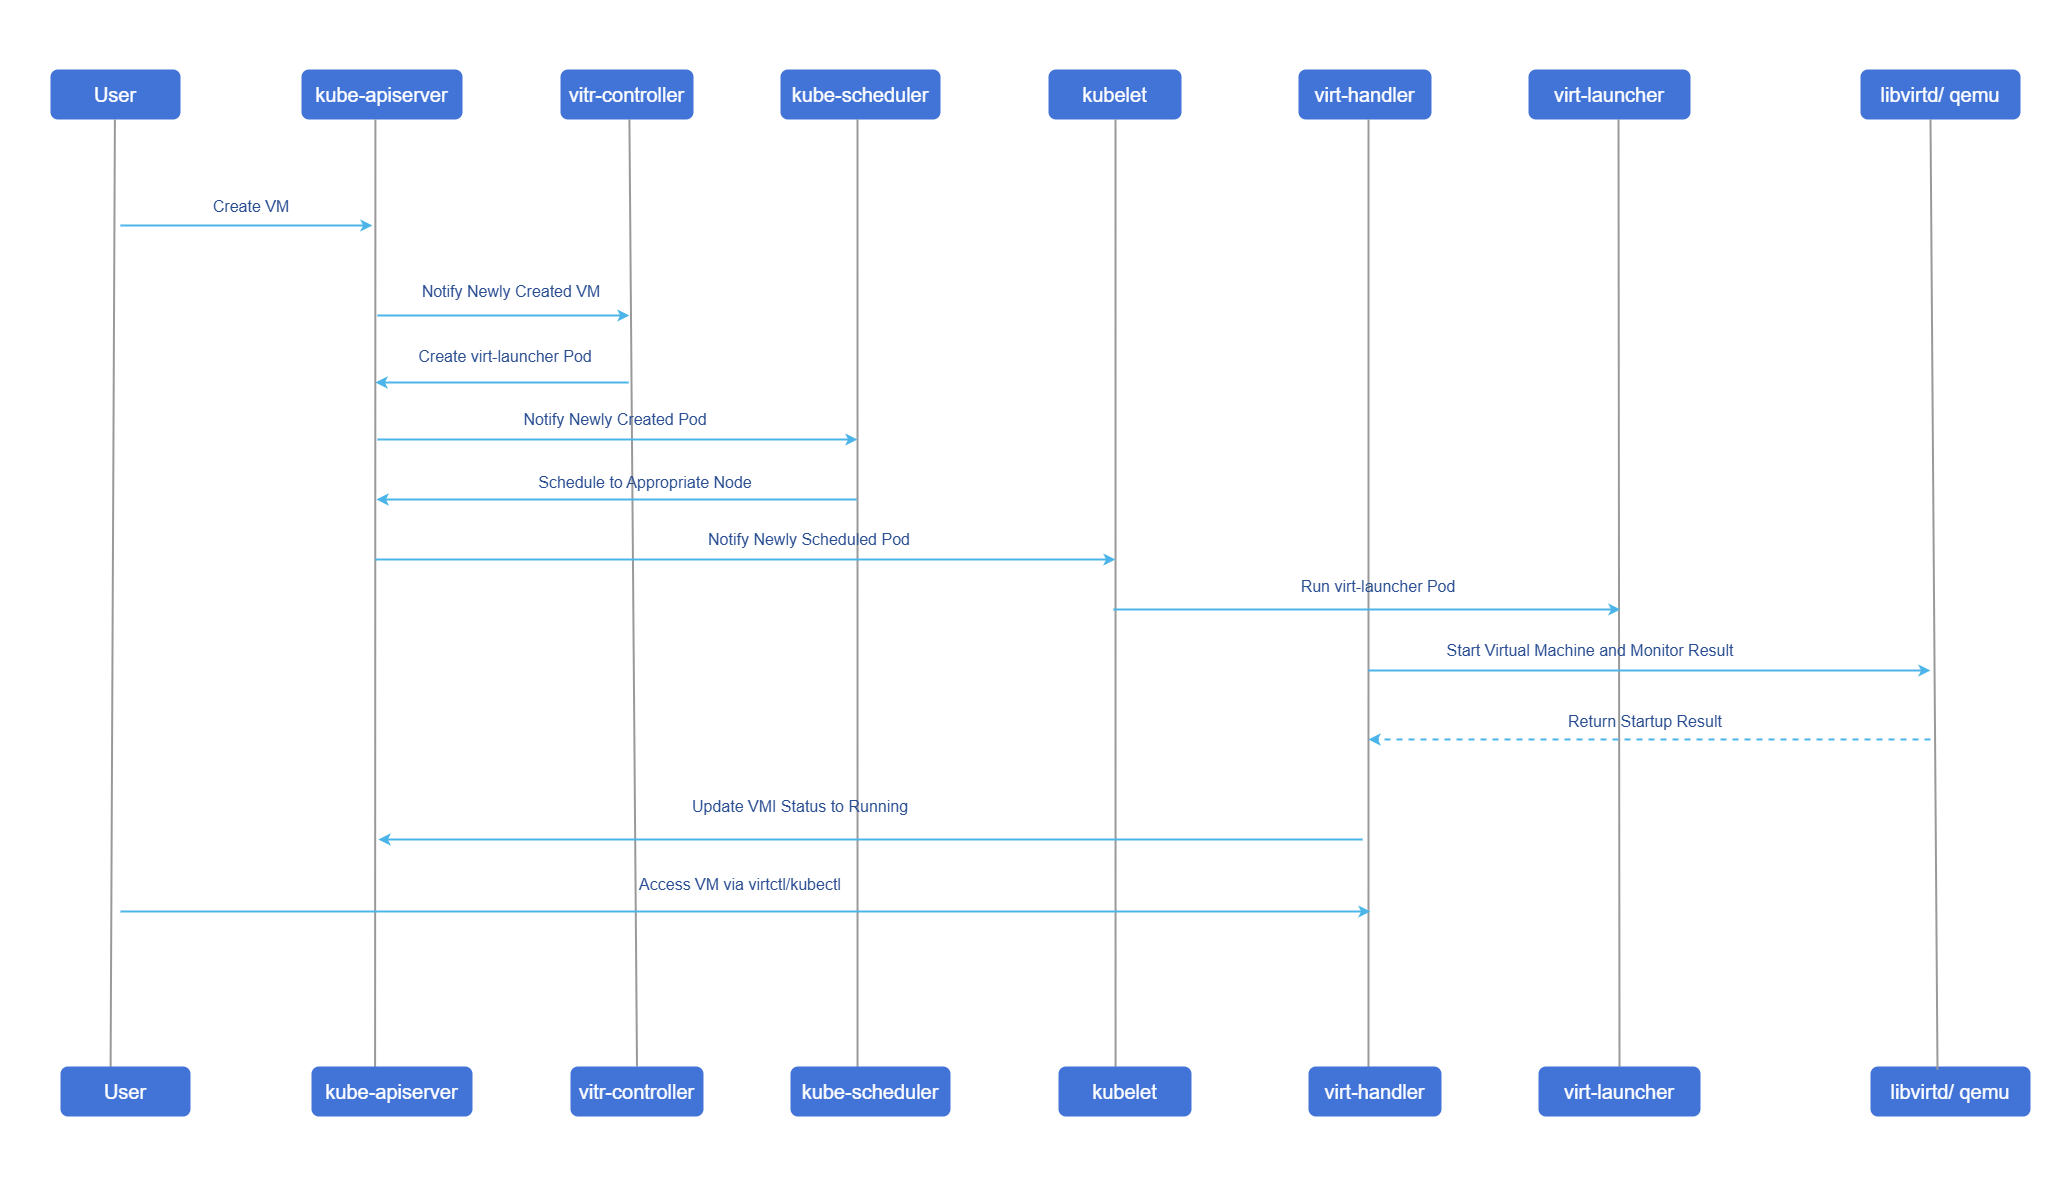
- virt-controller: A cluster-level controller. It listens for changes in VM and VMI resources and is responsible for coordinating state consistency. For example, when a user creates a VM, it creates the corresponding VMI and virt-launcher Pod.
- virt-handler: Deployed as a DaemonSet on each compute node. Responsible for node-level VMI lifecycle operations (such as startup, shutdown, monitoring), and provides a local REST interface for virt-api to invoke for operations such as console connections.
- virt-launcher: Runs inside the Pod corresponding to each VMI. It is a lightweight container that contains libvirtd and qemu processes internally, responsible for actually starting and managing the VM. It also starts a gRPC server for virt-handler to communicate with and control it.
- libvirtd/qemu: Runs inside the virt-launcher Pod. libvirt encapsulates Hypervisor operation instructions and converts them into requests to qemu; qemu relies on the host's KVM module and hardware virtualization features to run VMs.
Creation and Scheduling Flow
Figure 2 Creation and Scheduling Flow
Relationship with Related Features
- Privileged Mode Requirement: The Kubernetes API Server must be started with the
--allow-privileged=trueparameter to allow KubeVirt's privileged DaemonSet (virt-handler) to run. - Hardware Requirements: Nodes must support hardware virtualization (Intel VT-x or AMD-V) and it must be enabled in BIOS. For ARM64 architecture, the corresponding virtualization extensions must be supported.
Using KubeVirt
Prerequisites
- Kubernetes Version: It is recommended to use the openFuyao community recommended version v1.34.3 or a compatible version.
- Install docker for building VM images
Background Information
KubeVirt leverages Kubernetes native extension capabilities to implement unified access of VMs and containers to the K8s declarative management API. VMs can reuse cluster orchestration, scheduling, network policies and other capabilities, and support VM power on/off, hot migration, and other features; currently it needs to be adapted and deployed on Kunpeng server environments.
Usage Limitations
Use hardware that supports virtualization.
Operation Steps
Basic Environment Preparation.
1.1 Install Dependency Packages.
Execute the following command to install KVM (Kernel-based Virtual Machine) related dependencies on all nodes.
yum install -y qemu-kvm libvirt virt-install bridge-utils1.2 Verify Virtualization Support
Execute the following command to check whether the node meets virtualization conditions, ensuring all critical items display PASS:
virt-host-validate qemuExpected output example:
QEMU: Checking if device /dev/kvm exists                                   : PASS
QEMU: Checking if device /dev/vhost-net exists                             : PASS
QEMU: Checking if device /dev/net/tun exists                               : PASS
QEMU: Checking for cgroup 'cpu' controller support                         : PASS
QEMU: Checking for cgroup 'cpuacct' controller support                     : PASS
QEMU: Checking for cgroup 'cpuset' controller support                      : PASS
QEMU: Checking for cgroup 'memory' controller support                      : PASS
QEMU: Checking for cgroup 'devices' controller support                     : PASS
QEMU: Checking for cgroup 'blkio' controller support                       : PASS
...
KubeVirt Deployment.
2.1 Install virt-operator.
Execute the following command to download the virt-operator configuration file, and then apply the configuration.
# Download the KubeVirt 1.7.1 official Operator deployment file
wget https://github.com/kubevirt/kubevirt/releases/download/v1.7.1/kubevirt-operator.yaml
# Deploy KubeVirt Operator in the Kubernetes cluster
kubectl apply -f kubevirt-operator.yaml
2.2 Install KubeVirt Core Components.
Create a kubevirt-cr.yaml file to define the KubeVirt instance:
#KubeVirt Custom Resource Definition (CRD) configuration file
#For deploying and configuring KubeVirt virtualization components in the Kubernetes cluster
apiVersion: kubevirt.io/v1
kind: KubeVirt
metadata:
  name: kubevirt
  namespace: kubevirt
spec:
  certificateRotateStrategy: {}
  configuration:
    developerConfiguration:
      useEmulation: false
      featureGates: []
  customizeComponents: {}
  imagePullPolicy: IfNotPresent
  workloadUpdateStrategy: {}
Execute the following command to create and apply the configuration:
kubectl apply -f kubevirt-cr.yaml2.3 Verify Deployment Status.
Execute the following command and wait for all components to run normally:
kubectl get pods -n kubevirtWhen the status of all components is Running, it indicates the components are running normally.
2.4 Install
virtctl Client.virtctl is a dedicated command-line tool for managing KubeVirt VMs. Execute the following command to install virtctl.
# Download the ARM64 version
wget https://github.com/kubevirt/kubevirt/releases/download/v1.7.1/virtctl-v1.7.1-linux-arm64

# Rename and move to path
mv virtctl-v1.7.1-linux-arm64 /usr/local/bin/virtctl
chmod +x /usr/local/bin/virtctl

# Verify version
virtctl version
Output of version information with Platform displayed as Linux/arm64 indicates successful deployment.
Build KubeVirt Image.
3.1 Execute the following command to prepare the disk file.
wget https://dl-cdn.openeuler.openatom.cn/openEuler-22.03-LTS-SP3/virtual_machine_img/aarch64/openEuler-22.03-LTS-SP3-aarch64.qcow2.xz
xz -d openEuler-22.03-LTS-SP3-aarch64.qcow2.xz
3.2 Write Dockerfile.
Create a Dockerfile to package the qcow2 image into a container:
FROM openeuler/openeuler:22.03 ADD openEuler-22.03-LTS-SP3-aarch64.qcow2 /disk/disk.qcow2 RUN chmod 644 /disk/disk.qcow2 Note:
Note:The path here must be consistent with the path defined in oe-vm.yaml in step 4.1.
3.3 Build and Export Image.
Execute the following command to build and export the image
# Build image
docker build -t openeuler2203-sp3:v1 .

# Export image as tar package
docker save -o openeuler.tar openeuler2203-sp3:v1
3.4 Import Image to Container Runtime.
Execute the following command to import the image into the container runtime used by Kubernetes (using containerd as an example here):
ctr -n k8s.io image import openeuler.tarCreate and Run openEuler VM.
4.1 Prepare VM Definition File (oe-vm.yaml)
apiVersion: kubevirt.io/v1
kind: VirtualMachine
metadata:
  name: openeuler-vm
spec:
  running: false  # Initial state is stopped, manually start after creation
  template:
    metadata:
      labels:
        kubevirt.io/domain: openeuler
    spec:
      domain:
        devices:
          disks:
            - name: rootfs
              disk:
                bus: virtio
            - name: cloudinit
              disk:
                bus: virtio
          interfaces:
            - name: default
              bridge: {}
        resources:
          requests:
            memory: 1Gi
          limits:
            memory: 1Gi
      networks:
        - name: default
          pod: {}
      volumes:
        - name: rootfs
          containerDisk:
            image: openeuler2203-sp3:v1
            path: /disk/disk.qcow2  # Must be consistent with the path in Dockerfile
        - name: cloudinit
          cloudInitNoCloud:
            userData: |-
              password: openEuler12#$
              chpasswd: { expire: False }
              ssh_pwauth: True
              packages:
                - nginx
              runcmd:
                - systemctl enable nginx
                - systemctl start nginx
4.2 Create and Start VM.
Execute the following command to create and start the VM.
# Create VM resource
kubectl apply -f oe-vm.yaml

# View status (should be Stopped at this point)
kubectl get vms

# Start the VM
virtctl start openeuler-vm

# View status again, wait until it becomes Running
kubectl get vms
4.3 Connect to VM.
The VM supports two login methods:
virtctl console (serial port)andSSH. openEuler image default login account:root, default password:openEuler12#$- Method 1: Execute the following command to connect to the VM using virtctl console (serial port connection)
virtctl console openeuler-vmThe following result indicates successful connection to the VM:
[root@master ~]# virtctl console openeuler Successfully connected to openeuler console. Press Ctrl+] or Ctrl+5 to exit console. openeuler login: root Password: Last login: Thu Mar 5 09:02:51 from 76.3.165.18 Welcome to 5.10.0-182.0.0.95.oe2203sp3.aarch64 System information as of time: Thu Mar 5 08:23:47 AM UTC 2026 System load: 0.00 Processes: 93 Memory used: 10.2% Swap used: 0.0% Usage On: 4% IP address: 172.27.205.169 Users online: 1- Method 2: Connect using SSH.
Execute the following command to obtain the VM IP address:
kubectl get vmi openeuler-vm -o jsonpath='{.status.interfaces[0].ipAddress}'The following result indicates successful connection to the VM.
......

Welcome to 5.10.0-182.0.0.95.oe2203sp3.aarch64

System information as of time:  Thu Mar  5 08:23:47 AM UTC 2026

System load:    0.00
Processes:      93
Memory used:    10.2%
Swap used:      0.0%
Usage On:       4%
IP address:     172.27.205.169
Users online:   1
4.4 Stop VM.
Execute the following command to stop the VM
virtctl stop openeuler-vm
Using Advanced VM Management Capabilities
KubeVirt runs on Kunpeng nodes and supports ARM64 virtualization advanced VM management features, including: NIC hot-plug, macvlan support, SR-IOV hardware passthrough and hot migration, VM hot migration, etc.
NIC Hot-Plug Capability
Background Introduction
Add NICs to a running VM, or remove NICs from a running VM.
The specific implementation is to add and remove NICs from a running Pod. By adding the annotation k8s.v1.cni.cncf.io/networks, the controller listens for Pod changes, obtains container information (container ID and Net NS), and finally calls the CNI interface to add NICs for the container. The specific flow is as follows:
For the KubeVirt community network hot-plug user guide, please refer to KubeVirt Network Hot-Plug User Guide.
Prerequisites
Deploy Multus-cni thick plugin and Multus Dynamic Networks Controller
wget https://github.com/k8snetworkplumbingwg/multus-cni/blob/master/deployments/multus-daemonset-thick.yml
kubectl apply -f multus-daemonset-thick.yml
# The image used is ghcr.io/k8snetworkplumbingwg/multus-cni:snapshot-thick

wget https://github.com/k8snetworkplumbingwg/multus-dynamic-networks-controller/blob/main/manifests/dynamic-networks-controller.yaml
# The image in this yaml is ghcr.io/k8snetworkplumbingwg/multus-dynamic-networks-controller:latest-amd64
# Modify the image to ghcr.io/k8snetworkplumbingwg/multus-dynamic-networks-controller:latest
kubectl apply -f dynamic-networks-controller.yaml
Usage Limitations
- Currently, hot-plug is only supported for interfaces using the
virtiomodel and connected viabridgebinding orSR-IOVbinding. - Currently, hot-unplug is only supported for interfaces connected via
bridgebinding.
Operation Steps
Create a new
NetworkAttachmentDefinitionin the cluster.yamlapiVersion: k8s.cni.cncf.io/v1 kind: NetworkAttachmentDefinition metadata: name: new-fancy-net spec: config: '{ "cniVersion": "0.3.1", "type": "bridge", "mtu": 1300, "name":"new-fancy-net" }'Deploy VM and start VM to running state.
yaml# Original VM apiVersion: kubevirt.io/v1 kind: VirtualMachine metadata: name: vm-hotplug spec: running: false # Initial state is stopped, manually start after creation template: metadata: labels: kubevirt.io/domain: openeuler spec: domain: devices: disks: - name: rootfs disk: bus: virtio - name: cloudinit disk: bus: virtio interfaces: - name: default masquerade: {} resources: requests: memory: 1Gi limits: memory: 1Gi networks: - name: default pod: {} volumes: - name: rootfs containerDisk: image: openeuler2203-sp3-test:v5 path: /disk/disk.qcow2 # Must be consistent with the path in Dockerfile - name: cloudinit cloudInitNoCloud: userData: |- password: openEuler12#$ chpasswd: { expire: False } ssh_pwauth: True packages: - nginx runcmd: - systemctl enable nginx - systemctl start nginxAdd NIC.
kubectl edit vm vm-hotplugto add a NIC, update the VM'sspec.domain.devices.interfacesandspec.networksas follows:yamlspec: domain: devices: disks: - name: rootfs disk: bus: virtio - name: cloudinit disk: bus: virtio interfaces: - name: default masquerade: {} # new interface - name: dyniface1 bridge: {} resources: requests: memory: 1Gi limits: memory: 1Gi networks: - name: default pod: {} # new network - name: dyniface1 multus: networkName: new-fancy-netCheck whether the VM's network interface has been added successfully:
- The annotations in the
virt-launcherPod are updated, showing the new NIC configuration. - The new NIC appears in the
vmi's.status.interfaces. - A new NIC appears in the VM.
- The annotations in the
Remove NIC.
kubectl edit vm vm-hotplug to remove a NIC, update the corresponding NIC state in the VM's spec.domain.devices.interfaces to absent.
    spec:
      domain:
        devices:
          disks:
            - name: rootfs
              disk:
                bus: virtio
            - name: cloudinit
              disk:
                bus: virtio
          interfaces:
            - name: default
              masquerade: {}
              # set the interface state to absent
            - name: dyniface1
              bridge: {}
              state: absent
        resources:
          requests:
            memory: 1Gi
          limits:
            memory: 1Gi
      networks:
        - name: default
          pod: {}
        - name: dyniface1
          multus:
          networkName: new-fancy-net
Check whether the VM's network interface has been removed successfully:
- The annotations in the
virt-launcherPod are updated, the NIC is removed. - The NIC is removed from the
vmi's.status.interfaces. - The NIC is removed from the VM.
macvlan
Background Introduction
Macvlan is an efficient Linux network virtualization technology that allows multiple virtual network interfaces (i.e., "child interfaces") to be created on a single physical network interface (i.e., "parent interface"). Each child interface is assigned an independent MAC address and can be configured with an IP address for communication like a regular NIC. These virtual devices appear as multiple independent physical devices from the outside. The core advantage of this mechanism lies in performance. It bypasses the traditional Linux bridge, allowing data packets to be sent and received directly through the physical NIC, reducing the processing steps in the network stack, thereby lowering latency and increasing throughput. In the KubeVirt environment, it is primarily used to allow VMs to directly access the host's Underlay network, achieving network performance close to that of a physical machine.
macvtap CNI includes a device plugin that exposes macvtap interfaces to Pods. A meta-plugin like Multus obtains the interface name assigned by the device plugin and passes it as deviceID when calling the CNI plugin.
Usage Limitations
macvtap type network interfaces do not support hot-plug capability.
Prerequisites
Create macvtap CNI configuration.
# The theoretical upper limit of virtual device quantity is 1 million, recommended configuration is within 200
kind: ConfigMap
apiVersion: v1
metadata:
  name: macvtap-deviceplugin-config
data:
  DP_MACVTAP_CONF: |
    [ {
        "name" : "dataplane",
        "lowerDevice" : "enp1s0f0np0",
        "mode": "bridge",
        "capacity" : 20
    } ]
Deploy macvtap CNI.
wget https://github.com/kubevirt/macvtap-cni/blob/main/manifests/macvtap.yaml
kubectl apply -f macvtap.yaml
# The image used is quay.io/kubevirt/macvtap-cni:latest
Operation Steps
Create a new
NetworkAttachmentDefinitionin the cluster.yamlkind: NetworkAttachmentDefinition apiVersion: k8s.cni.cncf.io/v1 metadata: name: macvtapnetwork annotations: k8s.v1.cni.cncf.io/resourceName: macvtap.network.kubevirt.io/dataplane spec: config: '{ "cniVersion": "0.3.1", "name": "macvtapnetwork", "type": "macvtap", "mtu": 1500 }'Update kubevirt, add network.binding configuration.
yamlspec: certificateRotateStrategy: {} configuration: developerConfiguration: useEmulation: false network: # Add network.binding configuration binding: macvtap: domainAttachmentType: tap customizeComponents: {} imagePullPolicy: IfNotPresent imageRegistry: ttl.sh/openfuyao imageTag: v17 workloadUpdateStrategy: {}Configure macvtap interface in VM, add the VM's
spec.domain.devices.interfacesandspec.networks.yamlspec: domain: devices: disks: - name: rootfs disk: bus: virtio - name: cloudinit disk: bus: virtio interfaces: - name: default masquerade: {} - name: macvtap-net # Added: macvtap interface definition binding: # Added name: macvtap # Added resources: requests: memory: 1Gi limits: memory: 1Gi networks: - name: default pod: {} - name: macvtap-net # Added: macvtap network definition multus: # Added: specify using Multus networkName: macvtapnetwork # Added: corresponding NetworkAttachmentDefinition name volumes:Start VM to running state, enter the VM and check that there is a macvtap type NIC.
shellvirtctl start <vm-name> virtctl console <vm-name> ip a
SR-IOV
Background Introduction
SR-IOV (Single Root I/O Virtualization) is a hardware specification that allows a single physical PCIe device (such as a NIC) to "split" into multiple independent devices in a virtualized environment.
The core lies in two new types:
- Physical Function (PF): PF is an entity function with full PCIe capabilities, responsible for providing hardware business capabilities to the host, while also used to create and manage a corresponding set of VFs; PCIe hardware supporting SR-IOV contains at least 1 PF.
- Virtual Function (VF): VF is a lightweight PCIe logical device, derived from a PF; a single VF can only be attached to one VM at any given time, and a single VM can be configured with multiple VFs. The VM operating system can recognize a VF as a standard physical hardware device, for example, a VF split from an SR-IOV NIC appears as a native NIC in the guest.
When a VM directly uses a VF, data can bypass the host's complex software emulation layer (such as Linux bridge, Open vSwitch) and exchange directly between the VM and the physical NIC. This bypass of the operating system kernel for direct communication greatly reduces network latency and decreases additional CPU overhead, achieving performance close to that of a physical machine.
Usage Limitations
This feature requires Linux kernel VFIO support. SMMU must be enabled in BIOS, and iommu.passthrough=1 must be configured in grub to enable passthrough mode.
Prerequisites
Deploying SR-IOV Network Operator is a dangerous operation that will restart all nodes with SR-IOV devices.
# Install Operator-SDK
export ARCH=$(case $(uname -m) in x86_64) echo -n amd64 ;; aarch64) echo -n arm64 ;; *) echo -n $(uname -m) ;; esac)
export OS=$(uname | awk '{print tolower($0)}')
export OPERATOR_SDK_DL_URL=https://github.com/operator-framework/operator-sdk/releases/download/v1.42.2
curl -LO ${OPERATOR_SDK_DL_URL}/operator-sdk_${OS}_${ARCH}
chmod +x operator-sdk_${OS}_${ARCH} && mv operator-sdk_${OS}_${ARCH} /usr/local/bin/operator-sdk
# Install the operator, follow these steps to generate manifests from source
# You can also directly obtain the yaml file https://gitcode.com/openFuyao/kubevirt/tree/of-dev%2Fv1.7.1/examples/sriov
git clone https://github.com/k8snetworkplumbingwg/sriov-network-operator.git
cd sriov-network-operator
make deploy-setup-k8s
# Label nodes that need SR-IOV
kubectl label node node node-role.kubernetes.io/worker=Operation Steps
Create SriovNetworkNodePolicy.
yamlapiVersion: sriovnetwork.openshift.io/v1 kind: SriovNetworkNodePolicy metadata: name: policy-mellanox namespace: sriov-network-operator spec: nodeSelector: node-role.kubernetes.io/worker: "" resourceName: intel_sriov_vfio priority: 99 mtu: 1500 numVfs: 8 # Query the number of allocatable VFs: cat /sys/class/net/<interface_name>/device/sriov_totalvfs nicSelector: vendor: "15b3" # Check the reported vendor in sriovnetworknodestates resource deviceID: "1015" # Check the deviceID in sriovnetworknodestates resource rootDevices: - "0000:01:00.0" # Only use the first port enp1s0f0np0 deviceType: vfio-pci # kubevirt uses vfio-pci type isRdma: falseCreate SriovNetwork.
yamlapiVersion: sriovnetwork.openshift.io/v1 kind: SriovNetwork metadata: name: kubevirt-vfio-network namespace: sriov-network-operator # Use your actual namespace spec: networkNamespace: default # Adjust according to your VM deployment namespace resourceName: intel_sriov_vfio ipam: ""Configure sriov interface in VM, add the VM's
spec.domain.devices.interfacesandspec.networks.yamlapiVersion: kubevirt.io/v1 kind: VirtualMachine metadata: name: vm-sriov spec: running: false # Initial state is stopped, manually start after creation template: metadata: labels: kubevirt.io/domain: openeuler spec: domain: devices: disks: - name: rootfs disk: bus: virtio - name: cloudinit disk: bus: virtio interfaces: - name: default masquerade: {} - name: sriov-net sriov: {} resources: requests: memory: 1Gi limits: memory: 1Gi networks: - name: default pod: {} - multus: networkName: kubevirt-vfio-network # Consistent with SriovNetwork name name: sriov-net volumes: - name: rootfs containerDisk: image: openeuler2203-sp3-test:v5 path: /disk/disk.qcow2 # Must be consistent with the path in Dockerfile - name: cloudinit cloudInitNoCloud: userData: |- password: openEuler12#$ chpasswd: { expire: False } ssh_pwauth: True packages: - nginx runcmd: - systemctl enable nginx - systemctl start nginx
Start VM to running state, enter the VM and check that there is a fully functional real physical NIC interface of sriov type.
virtctl start <vm-name>
virtctl console <vm-name>
ip a- It has its own firmware version.
- It has directly loaded the vendor's
mlx5_coredriver. - Its hardware offload capabilities (such as TC offload) are available.
- Its physical link is properly connected (Link up).
SR-IOV Live Migration
Background Introduction
VMs configured with SR-IOV passthrough NICs support online hot migration. Because VFs use hardware passthrough mode, VMs cannot automatically re-attach corresponding VF resources after migration to the target node, requiring manual intervention for configuration. Short-term service interruption will occur during the migration process. To ensure rapid network recovery after migration, VMs must be pre-configured with static IP addresses and static MAC addresses, avoiding network parameter changes that could cause service anomalies after migration.
Usage Limitations
This feature requires Linux kernel VFIO support. SMMU must be enabled in BIOS, and iommu.passthrough=1 must be configured in grub to enable passthrough mode.
Prerequisites
None
Operation Steps
Enable the feature gate
SRIOVLiveMigration.yaml# kubectl edit -n kubevirt kubevirt spec: certificateRotateStrategy: {} configuration: developerConfiguration: featureGates: - SRIOVLiveMigration # Add SRIOVLiveMigration useEmulation: false migrations: unsafeMigrationOverride: true network: binding: macvtap: domainAttachmentType: tapConfigure sriov interface in the original VM, write static MAC address and IP address.
yamlapiVersion: kubevirt.io/v1 kind: VirtualMachine metadata: name: vm-sriov-ip-mac spec: running: false # Initial state is stopped, manually start after creation template: metadata: labels: kubevirt.io/domain: openeuler spec: domain: devices: disks: - name: rootfs disk: bus: virtio - name: cloudinit disk: bus: virtio interfaces: - name: default masquerade: {} - name: sriov-net macAddress: "02:00:00:00:00:01" # Specify static MAC address sriov: {} resources: requests: memory: 1Gi limits: memory: 1Gi networks: - name: default pod: {} - multus: networkName: kubevirt-vfio-network name: sriov-net volumes: - name: rootfs containerDisk: image: openeuler2203-sp3-test:v5 path: /disk/disk.qcow2 # Must be consistent with the path in Dockerfile - name: cloudinit cloudInitNoCloud: userData: |- password: openEuler12#$ chpasswd: { expire: False } ssh_pwauth: True packages: - nginx runcmd: - systemctl enable nginx - systemctl start nginx networkData: | version: 2 ethernets: sriov-net: match: macaddress: "02:00:00:00:00:01" set-name: sriov-net addresses: - 76.3.165.23/32 # Specify static IP dhcp4: noEnter the VM and check that the specified MAC address and IP address are on the sriov device.
shellvirtctl console <vm-name> ip aDeploy
VirtualMachineInstanceMigrationto execute hot migration.yamlapiVersion: kubevirt.io/v1 kind: VirtualMachineInstanceMigration metadata: name: migration-sriov spec: vmiName: vm-sriov-ip-macWait for migration to complete.
Confirm that the VM has migrated to another node. Enter the migrated VM and verify that the device still retains the configured MAC address and IP address.
shellkubectl get vm <vm-name> virtctl console <vm-name> ip a
VM Hot Migration
Background Introduction
The latest official kubevirt has declared support for ARM64 VM hot migration, as well as VM pause/resume, snapshot, and other capabilities.
Usage Limitations
None
Prerequisites
None
Operation Steps
Deploy original VM.
yamlapiVersion: kubevirt.io/v1 kind: VirtualMachine metadata: name: vm-migrate spec: running: false # Initial state is stopped, manually start after creation template: metadata: labels: kubevirt.io/domain: openeuler spec: domain: devices: disks: - name: rootfs disk: bus: virtio - name: cloudinit disk: bus: virtio interfaces: - name: default masquerade: {} resources: requests: memory: 1Gi limits: memory: 1Gi networks: - name: default pod: {} volumes: - name: rootfs containerDisk: image: openeuler2203-sp3-test:v5 path: /disk/disk.qcow2 # Must be consistent with the path in Dockerfile - name: cloudinit cloudInitNoCloud: userData: |- password: openEuler12#$ chpasswd: { expire: False } ssh_pwauth: True packages: - nginx runcmd: - systemctl enable nginx - systemctl start nginxStart VM to running state.
shellvirtctl start <vm-name>Deploy
VirtualMachineInstanceMigrationto execute hot migration.yamlapiVersion: kubevirt.io/v1 kind: VirtualMachineInstanceMigration metadata: name: migration-job spec: vmiName: vm-migrateWait for migration to complete.
Confirm that the VM has migrated to another node. Check
VirtualMachineInstance, where.status.migrationStatecontains migration information.
Using UI to Manage VM Capabilities
Background Introduction
The current openFuyao container platform management plane supports management of custom resources. VMs managed through KubeVirt capabilities are displayed as virtualmachines.kubevirt.io resources on the custom resources page, supporting basic lifecycle management operations.
Operation Limitations
None
Prerequisites
The openFuyao container platform management plane has been deployed.
Notice
VM operation permissions can be configured through page permission management to prevent unauthorized users from operating others' VMs: Please refer to RBAC Management.
Operation Steps
- Log in to the openFuyao management plane: Please refer to Registration and Login.
- VM lifecycle management operations.
- Create VM:
- In the openFuyao platform left navigation bar, select "Custom Resources" under "Resource Management" to enter the "Custom Resources" page.
- In the custom resources list page, find the virtualmachines.kubevirt.io resource and enter the "Instances" tab.
- Click the create button in the upper right corner and fill in the VM configuration information in the yaml template.
- Delete VM:
- In the "Instances" tab, select the VM to delete and click the delete button.
- Confirm the deletion operation.
- Power On/Power Off/Restart VM:
- In the "Instances" tab, select the VM to operate and click the Power On/Power Off/Restart button.
- When the page displays "Power On/Power Off/Restart successful", it indicates the operation was successful. When the page displays "Power On/Power Off/Restart unsuccessful", it indicates the operation failed. Please further analyze based on the prompt or logs.
- Create VM:
Licensed under the MulanPSL2
 YueGongWangAnBei No.44030002007300