Cluster Lifecycle Management
Feature Overview
Installation and deployment, as the starting point of a PaaS platform, are key indicators of product strength. The installation and deployment tool uses Cluster API to implement system installation and deployment and adopts the declarative API pattern of Kubernetes to manage multiple Kubernetes clusters, thereby simplifying Kubernetes cluster lifecycle management, refining both the cluster installation process and management details, and making the installation process highly automated. This section describes how to install service clusters and manage the cluster lifecycle after the management cluster is installed.
Application Scenarios
You can use the installation and deployment tool to create the openFuyao management plane and clusters to install and deploy the container platform.
Supported Capabilities
This feature supports the installation and deployment of the entire container platform. It allows you to manage the lifecycle of service clusters, including creating, removing, scaling, and upgrading service clusters.
Highlights
The installation and deployment tool uses Cluster API and adopts the declarative API pattern of Kubernetes to manage multiple Kubernetes clusters, thereby simplifying Kubernetes cluster lifecycle management and making the installation process highly automated.
Implementation Principles
- General Process
-
Download the BlueKing Kubernetes Engine (BKE) installation tool and initialize a bootstrap node.
-
The bootstrap node pushes the Agent to the management cluster node, deploys a Kubernetes cluster and Cluster API, and completes the creation of the management cluster.
-
On the openFuyao management plane, you can perform operations such as creating, uninstalling, and dynamically scaling service clusters, and upgrading Kubernetes versions (including dynamic scaling of the management cluster).
NOTE
- The bootstrap node is responsible for setting up the management cluster. The management cluster is responsible for setting up a service cluster. The service cluster is responsible for running customer programs.
- In the current installation and deployment tool, you can initialize the bootstrap node and set up the management cluster on the bootstrap node by running commands. You can use the Cluster Lifecycle Management page of openFuyao to create service clusters in the management cluster.
Figure 1 Installation and deployment process
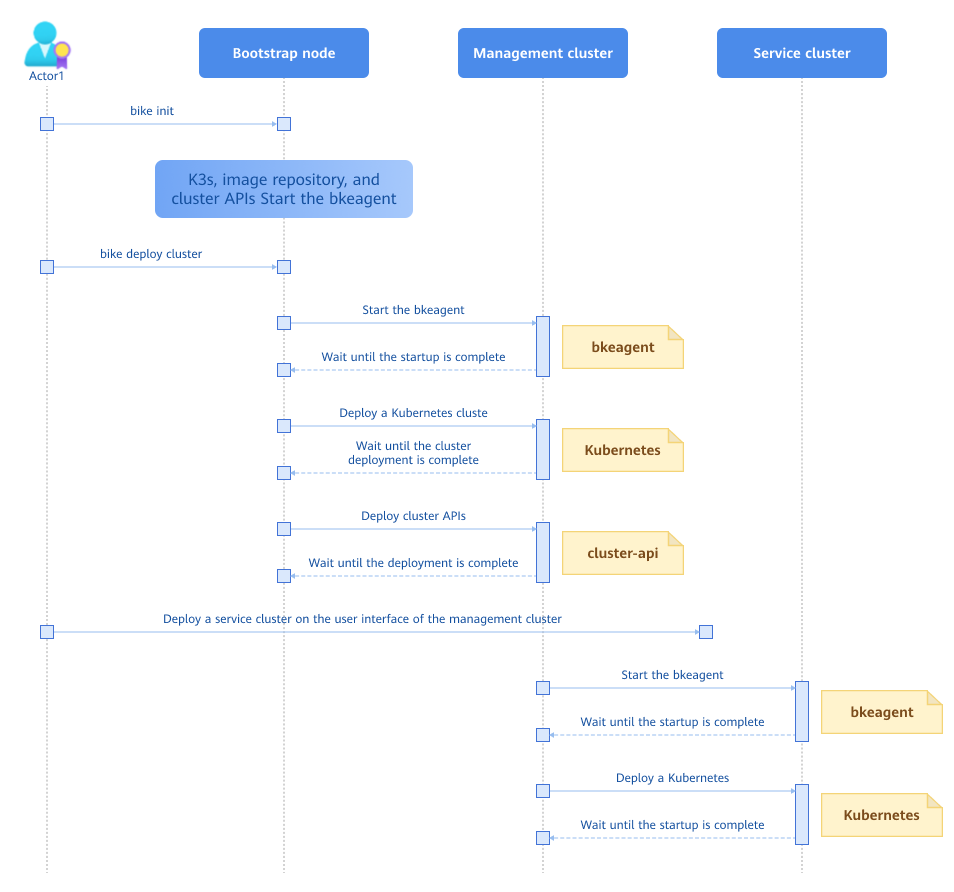
The BKE component in the figure consists of bkeadm, bkeagent, and Cluster API. The details are as follows:
- bkeadm
It is a BKE installation tool and is used only as a binary file on the bootstrap node. Its main functions include starting the image repository and YAML repository, starting the K3s cluster and installing Cluster API, and submitting the management cluster configuration.
- bkeagent
It is a cloud-native host machine management tool that listens to kube-apiserver instructions and executes the instructions on the host machine. Its main functions include listening to custom resource definition (CRD) resources and reporting execution results, switching the Kubernetes cluster to be listened to, and providing multiple built-in job types, such as node environment check, Docker installation, and shell script execution.
- cluster-api
It is a controller that distributes and starts bkeagent on all nodes, creates instructions for bkeagent, summarizes the results of the deployed clusters, and updates the results to bkecluster events.
Figure 2 Logical architecture of the system
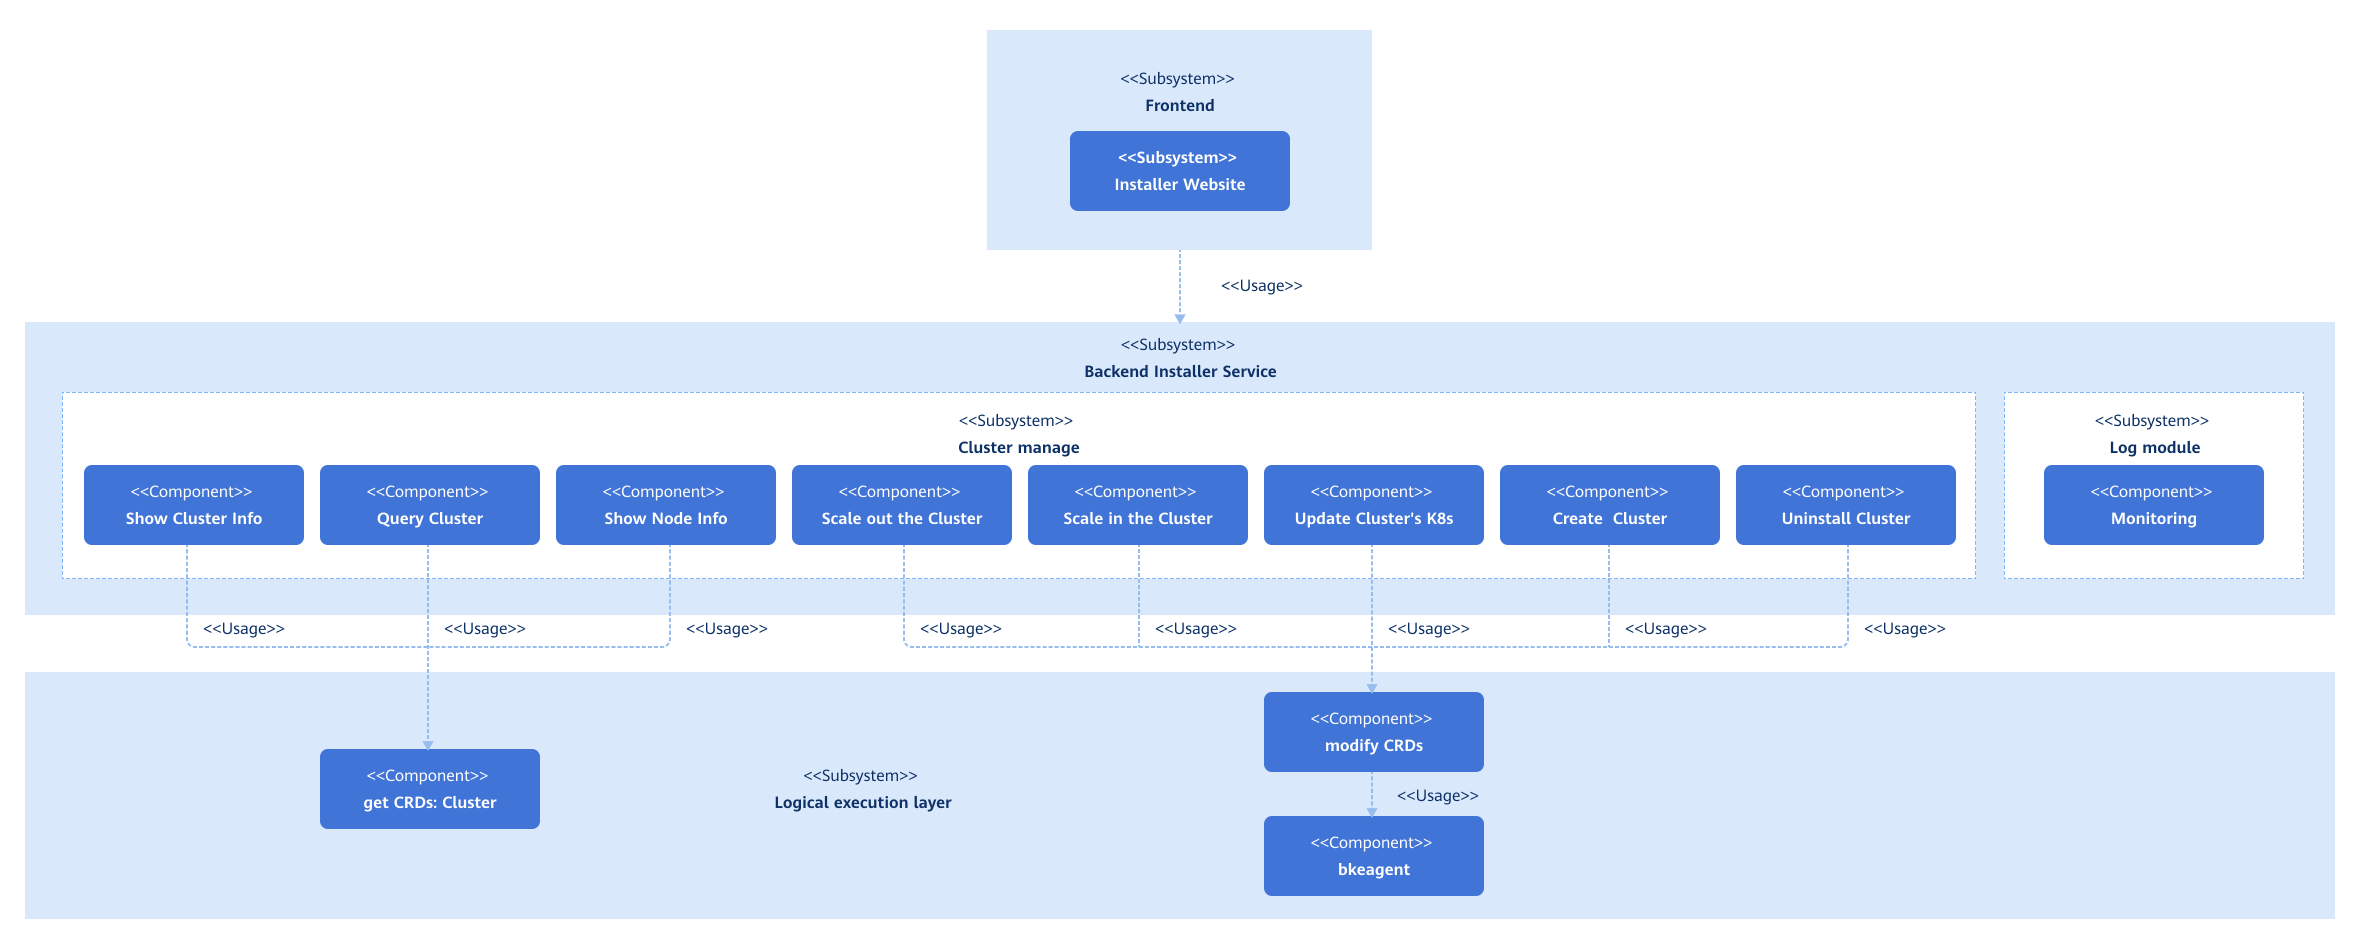
After the cluster configuration items are modified, the frontend submits the configuration file to the backend. The backend processes the configuration file, calls the APIs, and submits the configuration file to the corresponding Kubernetes API server to perform cluster management operations.
Relationship with Related Features
None.
Instances
Code links:
https://gitcode.com/openfuyao/installer-website
https://gitcode.com/openfuyao/installer-service
Installation
The installation generally consists of management cluster installation and service cluster installation. For details about how to install the management cluster, see Online Installation and Offline Installation. For details about how to install the service cluster, see the following sections.
Logging In to the openFuyao Management Plane
Enter https://_Login IP address of the bootstrap node:Web service port for cluster lifecycle management_ in the address box of a browser and enter the username and password to log in to the Cluster Lifecycle Management page.
- The password needs to be changed upon the first login.
- The default web service port of the Cluster Lifecycle Management page is 30010.
Adding a Cluster
Prerequisites
-
The bootstrap node has been configured.
-
The management cluster has been installed.
Context
You can create a service cluster on the Cluster Lifecycle Management page.
Constraints
-
Ensure that the node IP address, username, and password are correct.
-
When creating a high availability (HA) cluster, ensure that the IP address of the load balancer is correct.
Procedure
-
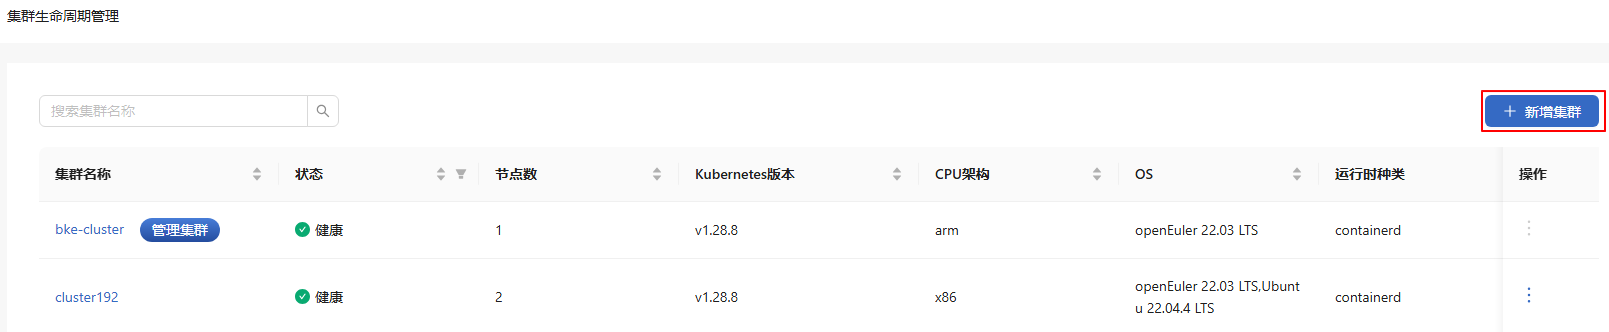
In the navigation pane, choose Cluster Lifecycle Management. A cluster list is displayed on the Cluster Lifecycle Management page. Cluster information, including the cluster name, status, and number of nodes, is provided.
-
Click Add Cluster to the upper right of the list. The Add Cluster page is displayed.
Figure 3 Adding a cluster
-
Enter related information on the page.
Table 1 Page description
| Area | Description |
|---|---|
| Basic Information | Specifies the name for the cluster. |
| Master Information | Information about the master node of the service cluster. Click |
| Node Information | Information about the common nodes of the service cluster. |
| Advanced Settings | By default, the preconfigured image repository address, image repository IP address, and chart repository address are used. For online installation, the addresses of the default online repositories are used by default. For offline installation, the addresses configured for the initialized node are used by default. |
-
Click Create at the bottom. The Cluster Information dialog box is displayed.
-
After all the cluster information is displayed, click OK.
-
After the system returns to the list page, check the cluster status. Installing is displayed in the Status column.
-
Check the status later to determine whether the cluster is added.
If an error message is displayed in Cluster Information, locate and resolve the error.
Removing a Cluster
Prerequisites
A cluster has been created on the Cluster Lifecycle Management page.
Context
You can remove a service cluster on the Cluster Lifecycle Management page.
Constraints
Currently, only clusters that have been successfully created can be removed. For a cluster that fails to be created, you need to troubleshoot the issue and then manually remove it on each node of the cluster. The procedure for manually removing a cluster is as follows:
-
Download and automatically install bkeadm on each node of the cluster.
curl -sfL https://openfuyao.obs.cn-north-4.myhuaweicloud.com/openFuyao/bkeadm/releases/download/latest/download.sh | bash -
Initialize the configuration.
bke reset --all --mountNote: Currently, the
bke resetoperation may cause residual container mount paths. You can run thedf -hcommand to check whether the overlay item exists. If so, you can run thebke resetcommand again or run therebootcommand to restart the server and delete the overlay item. -
Remove the BKE file.
rm -rf /bke
which bke | xargs rm -rf
Procedure
-
On the Cluster Lifecycle Management page, click
 in the Operation column and select Delete.
 -
In the dialog box that is displayed, select "I understand that the deletion operation is permanent and cannot be undone."
-
Click Delete. The message "Deleting... Please wait." is displayed, and Deleting is displayed in the Status column.
-
Check whether the cluster is removed. The cluster is removed when information about it is cleared from the list.
The removal process usually takes 10 to 20 minutes, depending on network conditions.
Upgrading a Cluster
Prerequisites
A cluster has been created on the Cluster Lifecycle Management page.
Context
You can perform an in-place Kubernetes upgrade for a service cluster on the Cluster Lifecycle Management page.
Constraints
-
Only upgrades to a higher Kubernetes version are supported. Version rollbacks are not supported.
-
In the current version, Kubernetes v1.28.8 is installed by default and can be upgraded to v1.29.1.
Precautions
-
The upgrade is irreversible. Exercise caution when performing this operation.
-
Before upgrading a cluster, ensure that the cluster is healthy. You are advised not to perform any operation on the cluster during an upgrade.
-
Only in-place upgrades are supported. During an upgrade, services are unavailable.
Procedure
-
Method 1: On the Cluster Lifecycle Management page, click
in the Operation column and select Upgrade.Method 2: In the upper right corner of the Cluster Details page, click Upgrade Cluster.
-
In the Upgrade Cluster dialog box that is displayed, select the target version from the drop-down list.
-
Confirm that all information is correct and click OK. The system automatically returns to the list page, and the Status column displays Upgrading. After the Status column indicates a successful upgrade, the cluster upgrade is complete.
After the upgrade is complete, you can view the latest Kubernetes version of the cluster in the Kubernetes version column on the cluster list page.
Scaling Up a Cluster
Prerequisites
A service cluster has been created on the Cluster Lifecycle Management page, and the cluster status is Healthy.
Context
You can scale up a service cluster on the Cluster Lifecycle Management page.
Constraints
During cluster scale-up, ensure that the nodes used for scale-up are not in use. During cluster scale-up, only worker nodes can be added.
Procedure
- On the Cluster Lifecycle Management page, click a cluster name. The Node Details page is displayed.
On the Node Details page, the master node is displayed before worker nodes in the node list.
- Click Add Node to the upper right of the list.
All newly added nodes must be worker nodes.
- In the dialog box that is displayed, enter related information, such as the node name, port number, IP address, username, and password.
-
Click
 to add more nodes.
 -
Click
 in the Operation column to remove the added node.
-
Then, click Next.
-
After all information is displayed in the displayed Cluster Information dialog box, click OK. The system returns to the Cluster Lifecycle Management page, and the status of the cluster is Installing.
-
Check the status of the cluster later to determine whether the cluster scale-up is complete.
- If the scale-up fails, the status of the cluster is Installation failed.
- If the scale-up is successful, the status of the cluster is Healthy.
Do not perform any other operations on the cluster until the scale-up succeeds because the cluster is unstable during the scale-up.
Scaling Down a Cluster
Prerequisites
A service cluster has been created on the Cluster Lifecycle Management page, and the cluster status is Healthy.
Context
You can scale down a service cluster on the Cluster Lifecycle Management page.
Constraints
During cluster scale-down, only worker nodes can be removed. Removed nodes cannot be restored. Proceed with caution.
Procedure
-
On the Cluster Lifecycle Management page, click a cluster name. The Node Details page is displayed.
-
Select a removal mode.
- Removing nodes in batches
-
Click the check boxes next to Node name to select the nodes to be removed.
-
Click Delete above the list.
- Removing a single node
-
Select the node to be removed.
-
Click
in the Operation column. -
In the dialog box that is displayed, select "I understand that the deletion operation cannot be undone."
-
In the dialog box that is displayed, click Delete to remove the selected node.
Status Description
During cluster operations (installation, scale-up, or upgrading), the cluster status changes are displayed in the Status column on the page.
Installation
During installation, the status changes are as follows:
-
If the cluster has only one worker node, the status can be Installing, Abnormal, or Healthy.
-
If the cluster has multiple worker nodes, the status can be Installing, Scaling up, Abnormal, or Healthy.
Scale-Up
During cluster scale-up, the status can be Installing, Scaling up, Abnormal, or Healthy.
Upgrade
During a cluster upgrade, the status can be Upgrading, Abnormal, or Healthy.
Actual Actions Performed During Each Status
Table 2 Status and related actions
| Status | Related Action |
|---|---|
| Installing | Preparing the node environment, integrating with Cluster API, creating cluster certificates, configuring the cluster entry, and initializing and adding the master node. |
| Scaling up | Adding worker nodes to the cluster. |
| Upgrading | Upgrading the master and worker nodes. |
| Abnormal | A cluster health check is performed during installation, scale-up, or an upgrade, and some Pods are not ready. |
| Healthy | The cluster is in a healthy status. |