Colocation
Feature Overview
As cloud services and hardware resources become increasingly diversified, higher management requirements are imposed on cloud native systems, such as resource utilization optimization and service quality assurance. Various colocation solutions have emerged to ensure that a colocation system involving diversified services and computing power runs in the optimal state. openFuyao's colocation and resource overselling solution provides the following functions:
- Multi-tier QoS management for services
- Service feature–aware scheduling
- Colocation node management
- Colocation policy configuration
- Management and reporting of oversold resources of nodes
- NRI-based, non-intrusive colocation pod creation and cgroup management
- Multi-layer optimization technologies, such as single-node colocation engine (Rubik) and kernel isolation
Applicable Scenarios
When deploying a workload, you need to determine the QoS level of the workload based on its characteristics. The scheduler adds necessary colocation information to the workload and schedules the workload to a colocation or non-colocation node to meet your colocation requirements. You can also manage colocation scheduling and colocation nodes through unified colocation configurations.
Supported Capabilities
- Priority-based scheduling and load balancing are supported for services with different QoS levels.
- On a single node, online services can preempt CPU and memory resources of offline services to preferentially guarantee their QoS.
- Offline services can be evicted and rescheduled based on the CPU and memory watermarks on a single node.
- Monitoring and viewing of colocation resources are supported.
Highlights
- openFuyao adopts industry-leading colocation and resource overselling solutions. It supports hybrid deployment of online and offline services. During peak periods of online services, resource scheduling is prioritized to guarantee online services. During off-peak periods of online services, offline services are allowed to utilize oversold resources, improving cluster resource utilization.
- Services are classified into online services (HLS services with high CPU pinning priority and LS services with low CPU pinning priority) and offline services (BE services that use oversold resources). Multiple QoS levels are defined for different services. (HLS, LS, and BE are short for highly latency sensitive, latency sensitive, and best effort.) At the scheduling layer, the scheduler ensures high-priority tasks can preempt resources from low-priority ones. In addition, offline service eviction is supported to prevent offline services from being preempted by online services with high resource utilization for a long time. On a single node, CPU pinning is supported for online HLS services, while NUMA-aware scheduling is supported for online LS services.
Restrictions
This feature, along with NUMA-aware scheduling and the NPU Operator, uses Volcano 1.9.0. If NUMA-aware scheduling has been deployed in advance, or NPU Operator has been deployed with vcscheduler.enabled and vccontroller.enabled enabled, you do not need to manually install Volcano. You can use it after configuring volcano-scheduler-configmap. For details, see Prerequisites in the installation section.
Implementation Principles
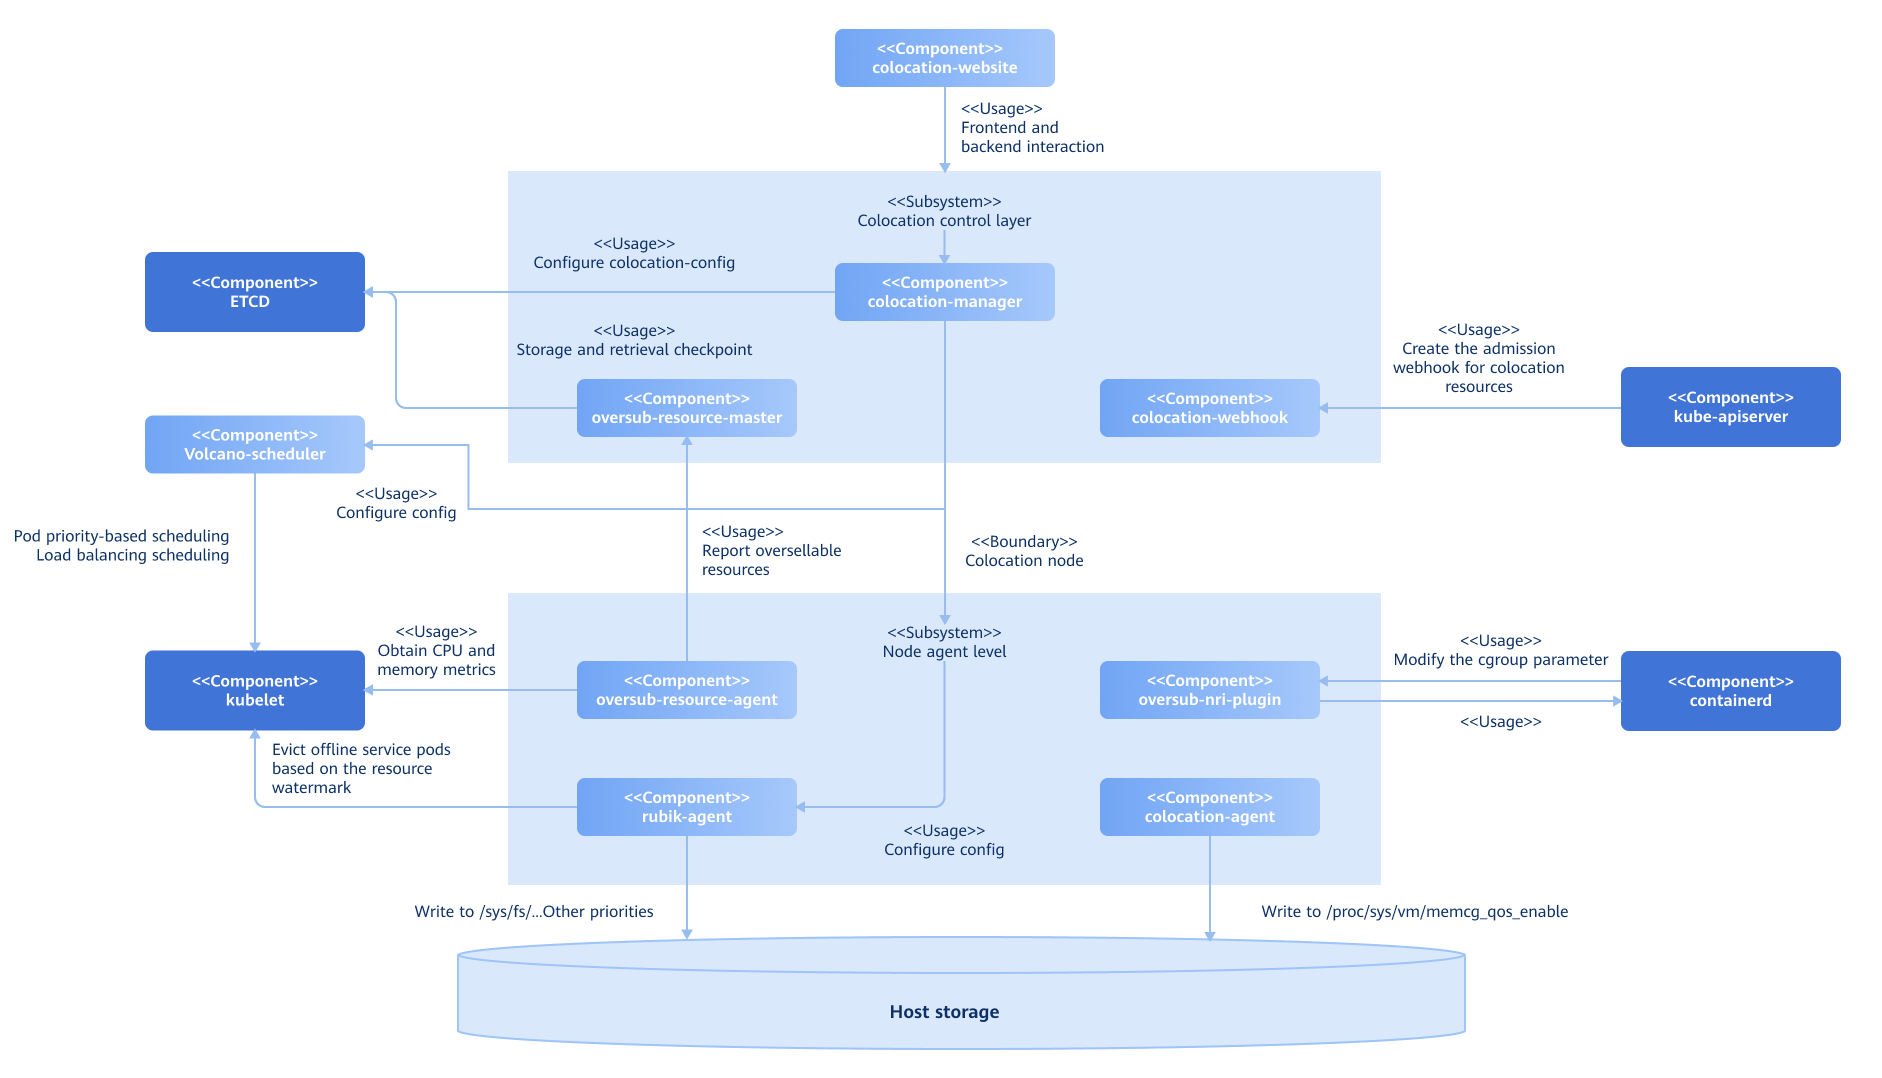
The colocation component is divided into two parts from the perspectives of functions and deployment modes: control layer and node agent.
-
The control layer is responsible for the unified colocation management.
- Global configuration plane: Global colocation configurations are provided, including startup of colocation nodes, the eviction watermark configuration of the colocation engine, and load balancing scheduling threshold settings of the scheduler.
- Admission control: An admission controller is provided for colocation workloads, which validates rules for workloads annotated with QoS levels and adds mandatory resource items for colocation scheduling (such as the scheduler, priority, and affinity label).
- Unified management of oversold resources: The control layer receives the metrics collected by the resource overselling agents, periodically pushes the resource usage of each node and pods on each node to the CRDs of the Checkpoint API, and periodically updates the total oversellable resources of nodes.
- REST API service: REST APIs are offered to integrate with visual interfaces.
- Colocation monitoring: A visual interface is provided for centralized colocation monitoring.
-
Node agents are deployed in Kubernetes clusters as DaemonSets to support resource overselling in colocation scenarios and injection of refined resource management policies.
- Resource overselling agent: Collects resource metrics, uses histograms to represent and predict resource usage details of workloads, and builds resource profiles for applications. It also reports resource overselling, predicts the usage of pod resources based on application resource profiles, reclaims allocated but unused resources, and reports the information to the unified management plane.
- Colocation agent: Includes the Rubik colocation engine and provides additional functionality to integrate with the kernel for enabling or disabling Rubik features.
- Resource overselling NRI plug-in: Uses the NRI mechanism of containerd to inject refined resource management policies in different lifecycle phases of containers.
Figure 1 Architecture of the colocation and resource overselling solution
Considering the overall scheduling framework and future multi-tier QoS levels for colocation, openFuyao introduces a three-tier QoS guarantee model. This model further classifies online services into HLS and LS services, while marking offline services as BE services, as detailed below.
Table 1 Three QoS levels for workloads
| QoS | Characteristics | Scenario | Description | Kubernetes QoS |
|---|---|---|---|---|
| HLS | Requirements for latency and stability are strict. Resources are not oversold and are reserved to guarantee service performance. | High-quality online services | It corresponds to the Kubernetes community's Guaranteed class. When the CPU pinning function is enabled in kubelet on a node, CPU cores are bound. The admission controller checks that the requested CPU equals the CPU limit and the requested memory equals the memory limit. In addition, CPU requests must be integers (whole cores), and pods labeled HLS are treated as exclusive Guaranteed pods. | Guaranteed |
| LS | Resources are shared, providing better elasticity for burst traffic. | Online services | It is a typical QoS level for microservice workloads, enabling better resource elasticity and more flexible resource adjustment. | Guaranteed/Burstable |
| BE | Resources are shared, leading to unguaranteed performance quality and the risk of forceful termination under extreme conditions. | Offline services | It is a typical QoS level for batch jobs. Computing throughput is stable within a certain period. Only oversold resources are used. | BestEffort |
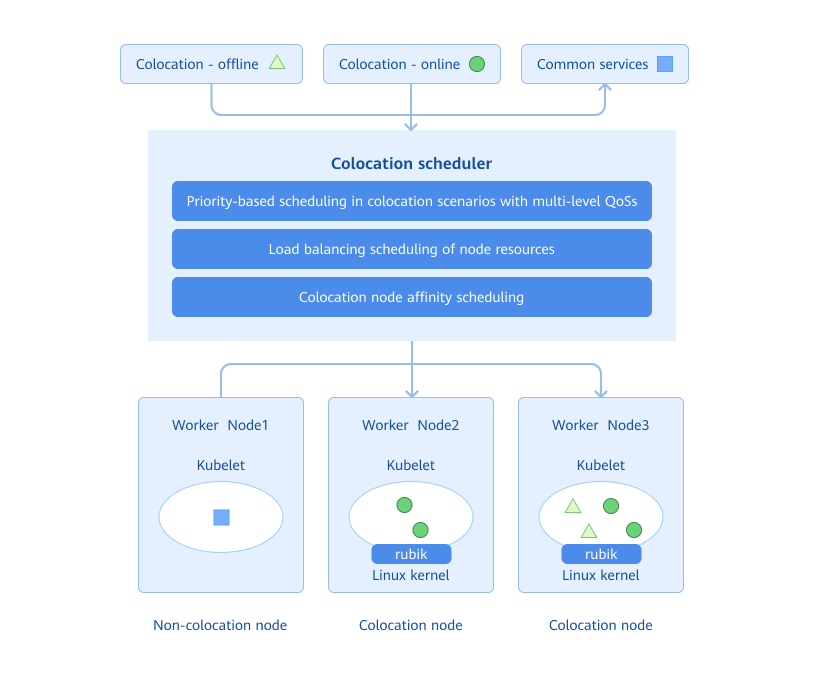
Nodes in the cluster are classified into colocation nodes and non-colocation nodes. Generally, online and offline services are deployed on colocation nodes, and common services are deployed on non-colocation nodes. The colocation scheduler properly schedules the service to a suitable node based on the attribute of the service to be deployed and the colocation attribute of nodes in the cluster. Workloads with different QoS levels are mapped to different PriorityClasses. During scheduling, the colocation scheduler performs priority-based scheduling or preemption at the scheduling queue layer according to PriorityClasses. This ensures that high-priority tasks are preferentially guaranteed at the scheduling layer. In addition, when selecting a node, the colocation scheduler also scores nodes based on their actual CPU and memory utilization and schedules workloads to a node with low comprehensive CPU and memory usage to minimize node overheating.
Figure 2 Colocation scheduling
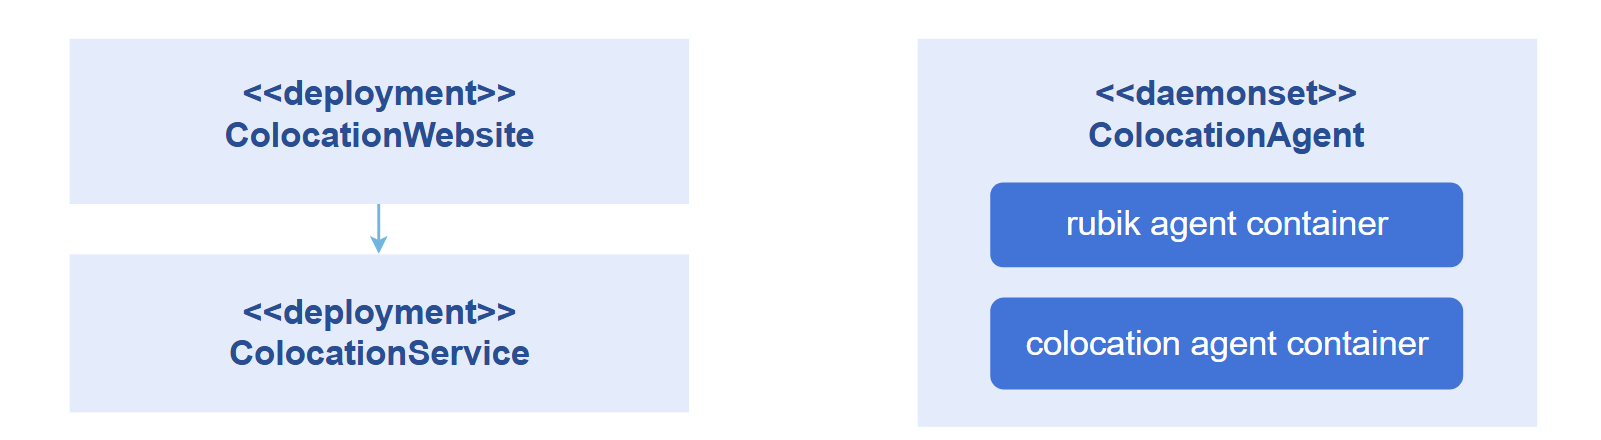
The colocation component consists of the colocation scheduler, unified colocation manager, single-node colocation engine, oversold resource reporting/management component, and NRI plug-in. The colocation scheduler is implemented based on the Volcano scheduler, and the single-node colocation engine is Rubik. The colocation component comprises the following main parts:
- colocation-website: Deployed in a cluster as a Deployment. It is used by the colocation frontend interface to interact with the colocation control layer. This enables functions including colocation statistics visualization, colocation node management, and colocation scheduling configuration management.
- colocation-service: Deployed in a cluster as a Deployment. It provides service APIs for external systems, such as APIs for monitoring colocation, adding and removing colocation nodes, and configuring colocation scheduling policies.
- colocation-agent: Deployed in a cluster as a DaemonSet. It is used to enable the memory QoS management function on colocation nodes.
Figure 3 Modular design of main parts of the colocation component and their deployment in a cluster
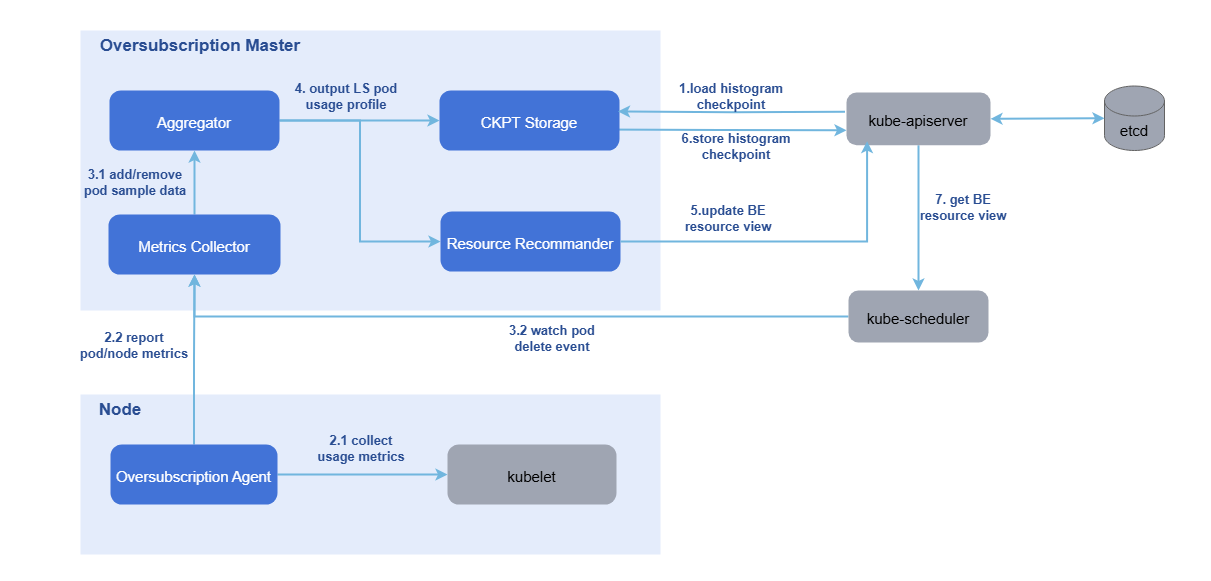
The system for reporting and managing resources on oversold nodes consists of oss-master (oversold master) and oss-agent (oversold agent).
- oss-agent: Deployed on oversold nodes in a cluster as a DaemonSet. The oss-agent obtains the resource sampling data of nodes and pods from the kubelet and reports the data to the oversold master.
- oss-master: Deployed in a cluster as a Deployment. The oversold master uses the sampled data to build resource usage profiles for online pods on each node. Based on these profiles, system configuration parameters, and an overselling formula, it updates the amount of BE resources that can be allocated to the node object.
Figure 4 Reporting and management of overselling node resources
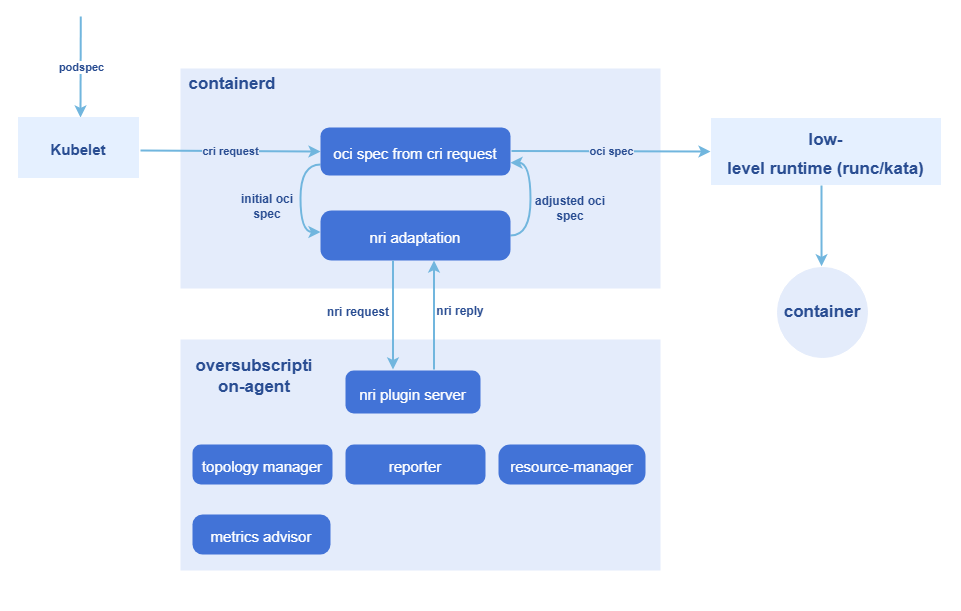
For the creation of oversold pods and the management of cgroups, the NRI mechanism is leveraged to execute custom logic at various container lifecycle stages:
- The NRI mechanism is used to add custom logic in pod and container lifecycle hooks.
- The NRI reply is used to modify the container OCI specifications.
- NRI UpdateContainer is used to modify the actual resources.
The entire process involves two workloads:
- overquota-pod-webhook: Deployed in a cluster as a Deployment. It serves as the admission controller for colocation workloads and validates whether a workload's configuration meets the resource requirements for its designated QoS level during admission. It rejects non-compliant colocation workloads. It also adds mandatory resource items for colocation scheduling (such as the scheduler, priority, and affinity label).
- overquota-pod-management: Deployed on an oversold node as a DaemonSet. The preceding NRI mechanism is used to modify the actual resources.
Figure 5 NRI-based, non-intrusive oversold pod creation and cgroup management
Related Features
This feature depends on the resource management module. The resource management module provides APIs for delivering workloads, and Prometheus provides the monitoring capability.
Instances
Code links: openFuyao/colocation-website (gitcode.com) openFuyao/colocation-service (gitcode.com) openFuyao/colocation-agent (gitcode.com) openFuyao/overquota-resource-management (gitcode.com) openFuyao/overquota-pod-management (gitcode.com)
Installation
Prerequisites
-
Kubernetes 1.21 or later, containerd 1.7.0 or later, and kube-prometheus 1.19 or later have been deployed.
-
openFuyao uses
volcano-scheduleras the colocation scheduler, which must be installed in Kubernetes in advance using Helm. Currently, full testing has been performed on version 1.9.0. Later versions are expected to work properly. You can also choose a later version. However, no guarantee is provided that all functions work correctly.2.1 Install volcano-scheduler using Helm.
 helm repo add volcano-sh https://volcano-sh.github.io/helm-charts
 helm repo update
 helm install volcano volcano-sh/volcano --version 1.9.0 -n volcano-system --create-namespace
NOTE
NOTE
If the NUMA-aware scheduling component has been installed on openFuyao, the Volcano component is installed by default. In this case, you can skip this step.2.2 Modify the default configurations of volcano-scheduler.
kubectl edit cm -n volcano-system volcano-scheduler-configmapModify the following annotations:
apiVersion: v1
data:
  volcano-scheduler.conf: |
    actions: "allocate, backfill, preempt"	# Ensure that the actions are in the correct category and order.
    tiers:
    - plugins:
      - name: priority             # Ensure that priority-based scheduling is enabled in tiers[0].plugins[0].
      - name: gang
        enablePreemptable: false
        enableJobStarving: false   # Ensure that enableJobStarving is disabled.
     ...
kind: ConfigMap
metadata:
    meta.helm.sh/release-name: volcano
    meta.helm.sh/release-namespace: volcano-system
  labels:
    app.kubernetes.io/managed-by: Helm
  name: volcano-scheduler-configmap
namespace: volcano-system -
The Rubik component is used as the colocation engine of openFuyao, which only runs on openEuler 22.03 LTS or later.
NOTE
All functions of colocation have been verified in openEuler 22.03 LTS. Later versions are expected to work properly. You can also choose a later version. However, no guarantee is provided that all functions work correctly. -
Enable port 10255 used by the kubelet on the colocation node.
4.1 On the colocation node, run the following command to view the configuration file:
vi /etc/kubernetes/kubelet-config.yamlNOTE
If the configuration file does not exist in the preceding path, you can find it under/var/lib/kubelet/config.yaml.4.2 Add readOnlyPort:10255 to the configuration file.
4.3 Enter :wq!. Save the settings and exit.
4.4 Run the following command to restart kubelet:
sudo systemctl restart kubelet -
Enable the CPU pinning and NUMA affinity policies in kubelet.
NOTE
This function is required to enable CPU pinning for pods with the QoS level of HLS. HLS pods can achieve CPU exclusivity and NUMA affinity only when the CPU manager policy is set to static on the kubelet, thereby improving HLS service performance.To enable this feature, modify the kubelet configuration file by performing the following steps:
5.1 Open the kubelet configuration file.
vi /etc/kubernetes/kubelet-config.yamlNOTE
If the configuration file does not exist in the preceding path, you can find it under/var/lib/kubelet/config.yaml.5.2 Add or modify the configuration items. (If you change the CPU manager policy to static, you also need to configure the reserved CPU.)
cpuManagerPolicy: static
systemReserved:
  cpu: "0.5"
# Note: When a node has limited CPU cores, enabling kubeReserved may lead to insufficient available CPU on the node, increasing the risk of kubelet crashes. Please proceed with caution.
kubeReserved:
  cpu: "0.5"
topologyManagerPolicy: xxx # best-effort / restricted / single-numa-node
5.3 Apply the modifications.
rm -rf /var/lib/kubelet/cpu_manager_state
systemctl daemon-reload
systemctl restart kubelet
5.4 Check the status of kubelet.
systemctl status kubeletThe Running state indicates success.
-
Enable the NRI extension function for containerd on the colocation node.
6.1 On the colocation node, go to
vim /etc/containerd/config.tomland check whether [plugins."io.containerd.nri.v1.nri"] exists.6.2 If so, change disable = true to disable = false. If not, add the following information under [plugins]:
 [plugins."io.containerd.nri.v1.nri"]

    disable = false

    disable_connections = false

    plugin_config_path="/etc/nri/conf.d"

    plugin_path="/opt/nri/plugins"

    plugin_registration_timeout="5s"

    plugin_request_timeout = "2s"

    socket_path="/var/run/nri/nri.sock"
6.3 After the configuration is complete, run the following command to restart containerd:
sudo systemctl restart containerd
Procedure
-
In the left navigation pane of the openFuyao platform, choose Application Market > Applications. The Applications page is displayed.
-
Select Extension in the Type filter on the left to view all extensions. Alternatively, enter colocation-package in the search box.
-
Click the colocation-package card. The details page of the colocation extension is displayed.
-
Click Deploy. The Deploy page is displayed.
-
Enter the application name and select the desired installation version and namespace.
-
Enter the values to be deployed in Values.yaml.
-
Click Deploy.
-
In the left navigation pane, click Extension Management to manage the component.
NOTE
After the deployment, you need to configure colocation for nodes in the cluster. This operation may cause workloads on the nodes to be evicted and rescheduled. Please properly plan colocation nodes in the cluster in a production environment and exercise caution when performing this operation.
Standalone Deployment
In addition to installation and deployment through the application market, this component also supports standalone deployment. The procedure is as follows:
For standalone deployment, you still need to deploy Kubernetes 1.26 or later, Prometheus, containerd, and Volcano v1.9.0 first.
-
Pull the image.
helm pull oci://harbor.openfuyao.com/openfuyao-catalog/charts/colocation-package --version xxxReplace xxx with the version of the Helm image to be pulled, for example, 0.13.0.
-
Decompress the installation package.
tar -zxvf colocation-package-xxx.tgz -
Disable openFuyao and OAuth.
vim colocation-package/values.yamlChange the values of
colocation-website.enableOAuthandcolocation-website.openFuyaoto false. -
Set the service type to NodePort.
vim colocation-package/values.yamlChange
colocation-website.service.typetoNodePort. -
Integrate with Prometheus.
vim colocation-package/values.yamlDuring standalone deployment, ensure that the monitoring component is already installed in the cluster. Change the values of the
colocation-service.serverHost.prometheusfield to the metric search address and port exposed by Prometheus in the current cluster, for example, http://prometheus-k8s.monitoring.svc.cluster.local:9090. -
Install the component.
helm install colocation-package ./ -
Access the standalone frontend.
You can enter http://client login IP address of the management plane:30880 in the address box of a browser to access the independent frontend.
Viewing the Overview
In the left navigation pane of the openFuyao platform, choose Computing Power Optimization Center > Colocation > Overview. The Overview page is displayed, which shows the workflow of colocation.
Prerequisites
The colocation-package extension has been deployed in the application market.
Context
View the colocation workflow, including environment preparation, colocation policy configuration, workload deployment, and colocation monitoring.
Restrictions
None.
Procedure
Choose Colocation > Overview. The Overview page is displayed.
- In the Environment Preparation step, you can modify the kubelet and containerd configurations to enable the colocation function of nodes. Click
 to view the configuration methods.
 - In the Colocation Policy Configuration step, you can click Configure Colocation Policy next to the description to go to the colocation policy configuration page.
- In the Workload Deployment step, you can use the workload deployment function to schedule workloads. You can click Deploy Workloads to go to the workload deployment page.
- In the Colocation Monitoring step, the health monitoring information about cluster-level colocation and node-level colocation is displayed. You can click Go to Colocation Monitoring to go to the colocation monitoring page.
Configuring Colocation Policies
In the left navigation pane of the openFuyao platform, choose Computing Power Optimization Center > Colocation > Colocation Policy Configuration. The Colocation Policy Configuration page is displayed. This page displays the list of nodes related to colocation in the cluster, and provides a window for configuring colocation parameters. In addition, you can enable or disable the colocation label of nodes in the node list to achieve balanced allocation and stable running of cluster resources.
Enabling or Disabling the Colocation Label of a Node
Context
You need to change the colocation label status of a specified node.
Restrictions
Changing the colocation label of a node may cause pods on the node to be evicted. Please properly plan the colocation capability of nodes in the cluster.
Procedure
In the colocation node list, turn on or off the switch in the Enable colocation node column corresponding to a node to enable or disable its colocation capability.
If the message "Colocation is enabled for node xxx" or "Colocation is disabled for node xxx" is displayed, the setting is successful.
Configuring Colocation Policy Parameters
Context
On this page, you can configure parameters for workload-aware scheduling and watermark-based offline workload eviction. You can set the actual CPU and memory load thresholds to control the scheduling policy of new workloads and prevent node overload. After watermark-based offline workload eviction is configured, when the node resource usage exceeds the watermark, offline job eviction is automatically triggered to free up resources.
Restrictions
- The load-aware scheduling balances resource utilization and stability. The threshold ranges from 0 to 100%, with a default value of 60%.
- Adjusting the threshold does not affect workloads that are already running.
- The watermark-based offline workload eviction only applies to offline jobs. Critical online services are not affected. The threshold ranges from 0 to 99%. The eviction process may cause temporary service fluctuations.
Procedure
-
On the Colocation Policy Configuration page, click Configure Colocation Policy Parameters in the upper-right area of the colocation node list.
-
In the displayed dialog box, turn on or off the switches for load-aware scheduling and watermark-based offline workload eviction.
NOTE
After this function is enabled, the CPU and memory thresholds of the node are 60% by default. You can change the thresholds as prompted. -
After modifying the thresholds, click OK to save the modification.
Using Colocation Monitoring
In the left navigation pane of the openFuyao platform, choose Computing Power Optimization Center > Colocation > Colocation Monitoring. By default, the Cluster-Level Colocation Monitoring page is displayed. This page displays the data monitoring panel related to colocation in the cluster.
Cluster-Level Colocation Monitoring
This page provides data monitoring related to colocation in the cluster, including colocation node information, colocation workload information, and resource usage in the cluster.
-
You can hover the mouse over the curve chart of a monitoring metric to view the detailed data.
-
In the Legend area of each chart, you can click a legend item to determine whether to display the data in the chart. This facilitates comparison between different datasets.
Node-Level Colocation Monitoring
Click the Node-Level Colocation Monitoring tab to switch to the node-level monitoring page. On this page, you can view node colocation data, such as the total physical resources used by each node and the resources used by HLS, LS, and BE pods.
-
You can hover the mouse over the curve chart of a monitoring metric to view the detailed data.
-
In the Legend area of each chart, you can click a legend item to determine whether to display the data in the chart. This facilitates comparison between different datasets.
-
In the filter box in the upper-right corner of the page, you can select or deselect some nodes.
Enabling NUMA Affinity Enhancement
Prerequisites
The node must have a multi-NUMA architecture and NUMA affinity must be enabled in the ConfigMap.
Context
On a server with multiple NUMA nodes, cross-NUMA-node memory access causes high latency, affecting the performance of LS services. The NUMA affinity enhancement function enables LS-level pods to be preferentially scheduled to the same NUMA node, reducing memory access latency and improving service stability.
Restrictions
-
Only LS-level pods (with low-priority online services) are supported. This function does not apply to pods of other QoS levels (such as HLS and BE).
-
This function only intercepts resource allocation before pod startup. It does not alter scheduling decisions made prior to enabling this function.
Procedure
-
Ensure that the colocation and resource overselling feature has been enabled.
Ensure that colocation has been enabled for the node. For details, see the procedure for enabling or disabling the colocation label of a node.
-
Enabling NUMA affinity enhancement.
Edit the ConfigMap to enable the NUMA affinity enhancement function.
kubectl edit configmap oversubscription-config -n openfuyao-colocationChange the value of
numaaffinity.enablefromfalsetotrue. -
Restart the component for the settings to take effect.
kubectl delete pod -n openfuyao-colocation -l app.kubernetes.io/name=overquota-pod-management -
Deploy the application.
Add LS-level annotations to pods that require NUMA affinity.
annotations:
openfuyao.com/QoS-level: "LS" -
Verify the result.
After the function is enabled, the system automatically performs the following operations during pod deployment.
- Checks the QoS levels of pods.
- Selects the optimal NUMA node for LS-level pods.
- Allows the pods to only use the CPU resources of the selected NUMA node.
You can view component logs to check whether the function is normal.
kubectl logs -n openfuyao-colocation -l app.kubernetes.io/name=overquota-pod-management
If "Successfully applied NUMA affinity for LS pod" is displayed in the log, the function is normal.
- If resources on a single NUMA node are insufficient, the system automatically selects another suitable node.
- HLS- and BE-level pods are not affected by the NUMA affinity function and are handled according to the existing scheduling policy.