Colocation
Feature Overview
As cloud services and hardware resources become increasingly diversified, higher management requirements are imposed on cloud native systems, such as resource utilization optimization and service quality assurance. Various colocation solutions have emerged to ensure that a colocation system involving diversified services and computing power runs in the optimal state. openFuyao's colocation and resource overselling solution provides the following functions:
- Service feature–aware scheduling
- Colocation node management
- Colocation workload management
- Management and reporting of oversold resources of nodes
- NRI-based, non-intrusive oversold pod creation and cgroup management
- Overselling scheduling
- Multi-layer optimization technologies, such as single-node colocation engine (Rubik) and kernel isolation
Applicable Scenarios
When deploying a workload, you need to determine whether the workload is an offline service, offline overselling service, online service, or non-colocation common service based on its characteristics. The scheduler schedules the workload to a colocation node, an overselling node, or a non-colocation node to meet your colocation requirements.
Supported Capabilities
Hybrid deployment policies for online, offline, and overselling services can be configured, and statistics can be visualized.
Highlights
openFuyao adopts industry-leading colocation and resource overselling solutions. It supports hybrid deployment of online and offline services. During peak periods of online services, resource scheduling is prioritized to guarantee online services. During off-peak periods of online services, offline services are allowed to utilize oversold resources, improving cluster resource utilization.
Implementation Principles
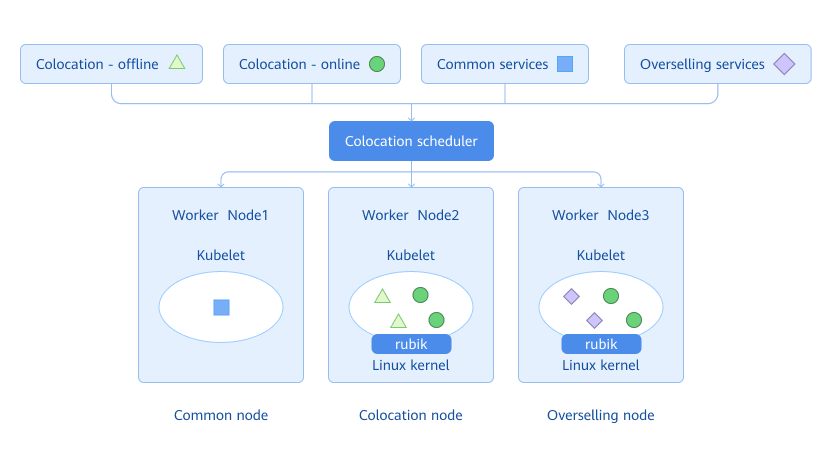
Nodes in the cluster are classified into overselling nodes, colocation nodes, and non-colocation nodes. Generally, online and offline services are deployed on colocation nodes, common services are deployed on non-colocation nodes, and overselling services are deployed on overselling nodes. The colocation scheduler properly schedules the service to a suitable node based on the attribute of the service to be deployed and the colocation attribute of nodes in the cluster.
Figure 1 Architecture of the colocation and resource overselling solution
- colocation-website: Deployed in a cluster as a Deployment. It is used by the colocation frontend interface to interact with the colocation control layer. This enables functions including colocation statistics visualization, colocation node management, colocation workload management, and colocation rule management.
- colocation-service: Deployed in a cluster as a Deployment. It provides service APIs for external systems, such as APIs for colocation statistics, adding and removing colocation nodes, switching and viewing the colocation status of workloads such as pods, Deployments, StatefulSets, Jobs, and CronJobs, as well as creating, modifying, viewing, and deleting colocation rules.
- colocation-agent: Deployed in a cluster as a DaemonSet. It is used to enable the memory QoS management function on colocation nodes.
- colocation-operator: Deployed in a cluster as a Deployment. It is used to define and manage the custom resource definitions (CRDs) of colocation rules, switch and manage workload status among colocation - offline, colocation - online, and non-colocation, and implement the admission controller.
Figure 2 Modular design of main parts of the colocation component and their deployment in a cluster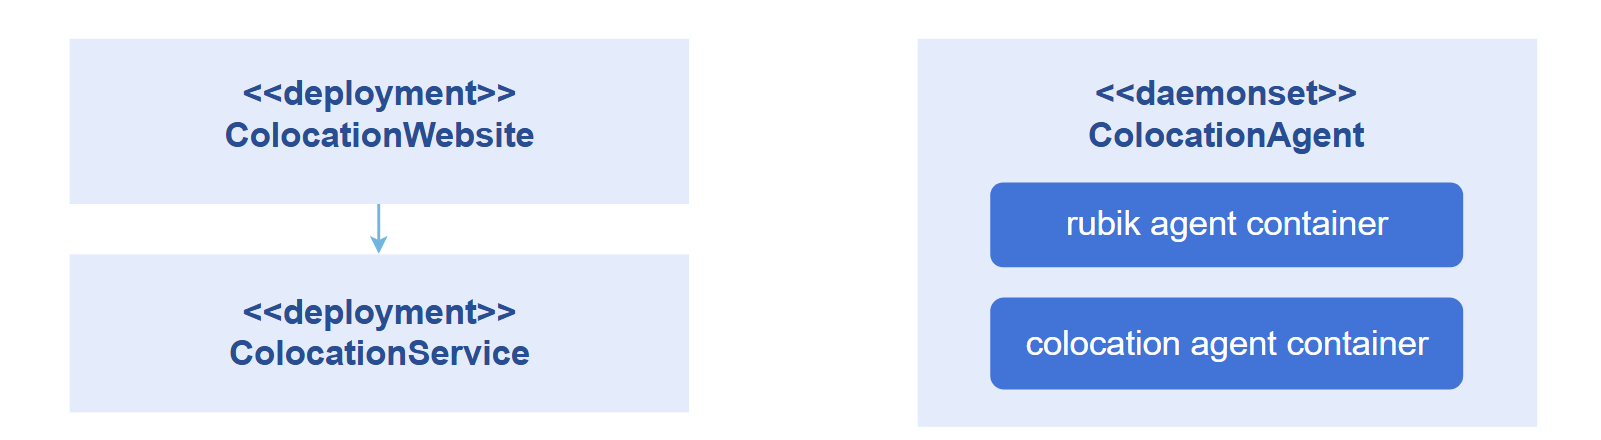
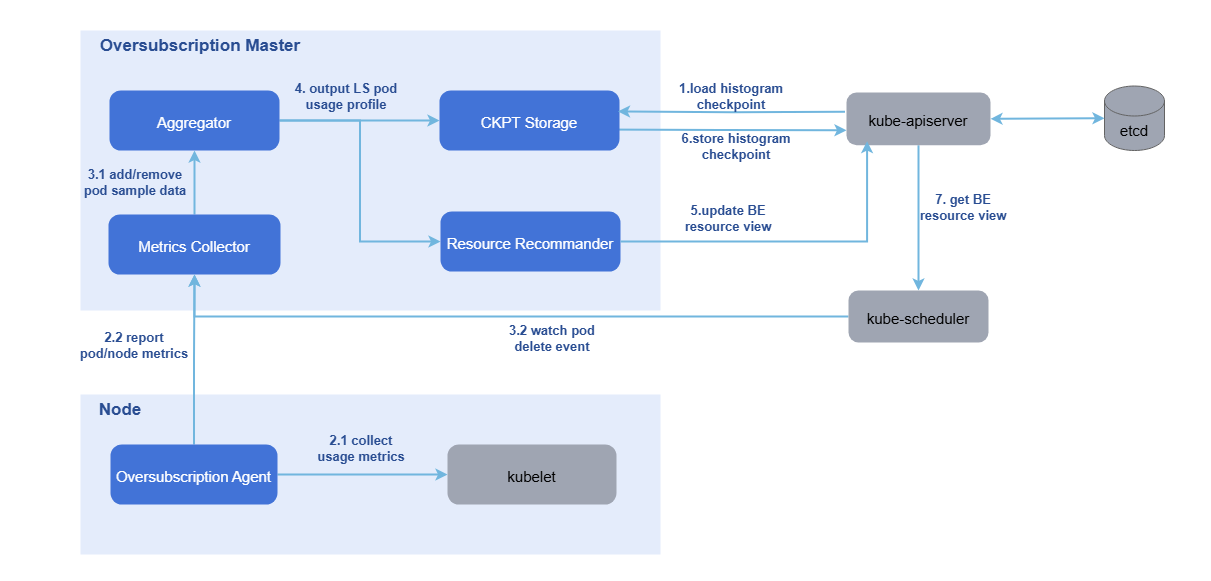
The system for reporting and managing resources on oversold nodes consists of oss-master (oversold master) and oss-agent (oversold agent).
- oss-agent: Deployed on oversold nodes in a cluster as a DaemonSet. The oss-agent obtains the resource sampling data of nodes and pods from the kubelet and reports the data to the oversold master.
- oss-master: Deployed in a cluster as a Deployment. The oversold master uses the sampled data to build resource usage profiles for LS pods on each node. Based on these profiles, system configuration parameters, and an overselling formula, it updates the amount of BE resources that can be allocated to the node object.
Figure 3 Reporting and management of overselling node resources
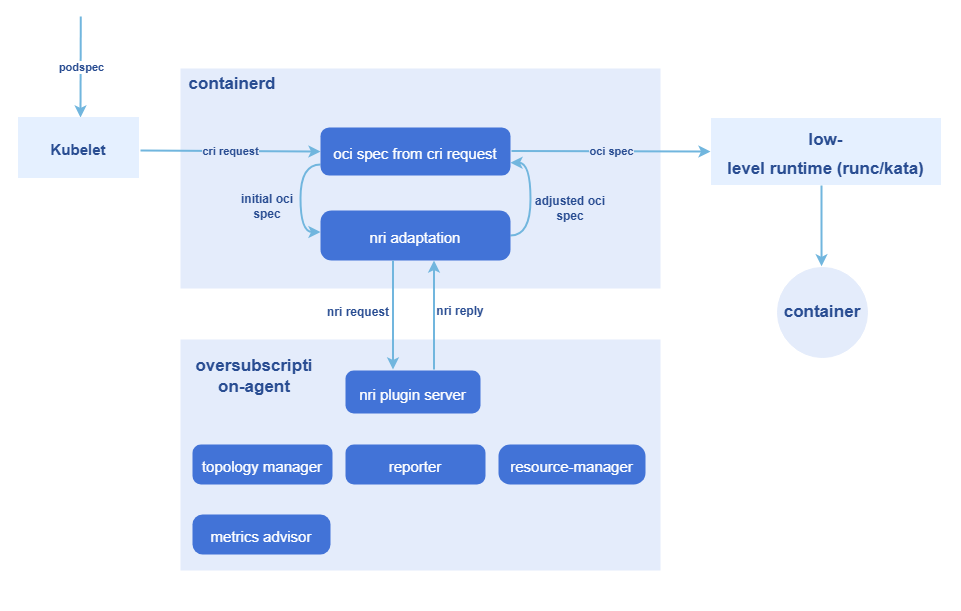
For the creation of oversold pods and the management of cgroups, the NRI mechanism is leveraged to execute custom logic at various container lifecycle stages:
- The NRI mechanism is used to add custom logic in pod and container lifecycle hooks.
- The NRI reply is used to modify the container OCI specifications.
- NRI UpdateContainer is used to modify the actual resources.
The entire process involves two workloads:
- overquota-pod-webhook: Deployed in a cluster as a Deployment. It serves as the admission controller for oversold workloads and validates whether a workload's configuration meets the overselling rule during admission. It rejects non-compliant overselling rules.
- overquota-pod-management: Deployed on an oversold node as a DaemonSet. The preceding NRI mechanism is used to modify the actual resources.
Figure 4 NRI-based, non-intrusive oversold pod creation and cgroup management
Instances
Code links:
openFuyao/colocation-website (gitcode.com)
openFuyao/colocation-service (gitcode.com)
openFuyao/colocation-agent (gitcode.com)
openFuyao/colocation-operator (gitcode.com)
openFuyao/overquota-resource-management (gitcode.com)
openFuyao/overquota-pod-management (gitcode.com)
Installation
Prerequisites
-
The colocation engine of
openFuyaois theRubikcomponent. TheRubikcomponent only runs on theopenEuleroperating system in versionopenEuler 22.03 LTSor later. All functions of colocation have been verified inopenEuler 22.03 LTS. Later versions are expected to work properly. You can also choose a later version. However, no guarantee is provided that all functions work correctly. -
Kubernetes 1.21 or later, containerd 1.7.0 or later, and kube-prometheus 1.19 or later have been deployed.
-
Enable port 10255 used by the kubelet on the colocation node.
3.1 On the colocation node, run the following command to view the configuration file:
vi /etc/kubernetes/kubelet-config.yaml NOTE
NOTE
If the configuration file does not exist in the preceding path, you can find it under/var/lib/kubelet/config.yaml.3.2 Add readOnlyPort:10255 to the configuration file, and save the file.
3.3 Run the following command to restart kubelet:
sudo systemctl restart kubelet -
Enable the NRI extension function for containerd on the colocation node.
4.1 On the colocation node, go to
vim /etc/containerd/config.tomland check whether [plugins."io.containerd.nri.v1.nri"] exists.4.2 If so, change disable = true to disable = false. If not, add the following information under [plugins]:
[plugins."io.containerd.nri.v1.nri"]

   disable = false

   disable_connections = false

   plugin_config_path="/etc/nri/conf.d"

   plugin_path="/opt/nri/plugins"

   plugin_registration_timeout="5s"

   plugin_request_timeout = "2s"

   socket_path="/var/run/nri/nri.sock"
4.3 After the configuration is complete, run the following command to restart containerd:
sudo systemctl restart containerd
Procedure
- In the left navigation pane of the openFuyao platform, choose Application Market > Applications. The Applications page is displayed.
- Select Extension in the Type filter on the left to view all extensions. Alternatively, enter colocation-package in the search box.
- Click the colocation-package card. The details page of the colocation extension is displayed.
- Click Deploy. The Deploy page is displayed.
- Enter the application name, select the version to be installed, and specify the namespace.
- Enter the values to be deployed in Values.yaml.
- Click Deploy.
- In the left navigation pane, click Extension Management to manage the component.
After the deployment, you need to configure colocation for nodes in the cluster. This operation may cause workloads on the nodes to be evicted and rescheduled. Please properly plan colocation nodes in the cluster in a production environment and exercise caution when performing this operation.
Standalone Deployment
In addition to installation and deployment through the application market, this component also supports standalone deployment. The procedure is as follows:
-
Pull the image.
helm pull oci://harbor.openfuyao.com/openfuyao-catalog/charts/colocation-package --version xxxReplace xxx with the version of the Helm image to be pulled, for example, 0.13.0.
-
Decompress the installation package.
tar -zxvf colocation-package-xxx.tgz -
Disable openFuyao and OAuth.
vim colocation-package/values.yamlChange the values of
colocation-website.enableOAuthandcolocation-website.openFuyaoto false. -
Set the service type to NodePort.
vim colocation-package/values.yamlChange
colocation-website.service.typetoNodePort. -
Integrate with
Prometheus.vim colocation-package/values.yamlDuring standalone deployment, ensure that the monitoring component is already installed in the cluster. Change the values of the
colocation-service.serviceHost.prometheusfield to the metric search address and port exposed by Prometheus in the current cluster, for example,http://prometheus-k8s.monitoring.svc.cluster.local:9090. -
Install the component.
helm install colocation-package ./ -
Access the standalone frontend.
Access the standalone frontend by visiting http://client login IP address of the management plane:30880.
Overview
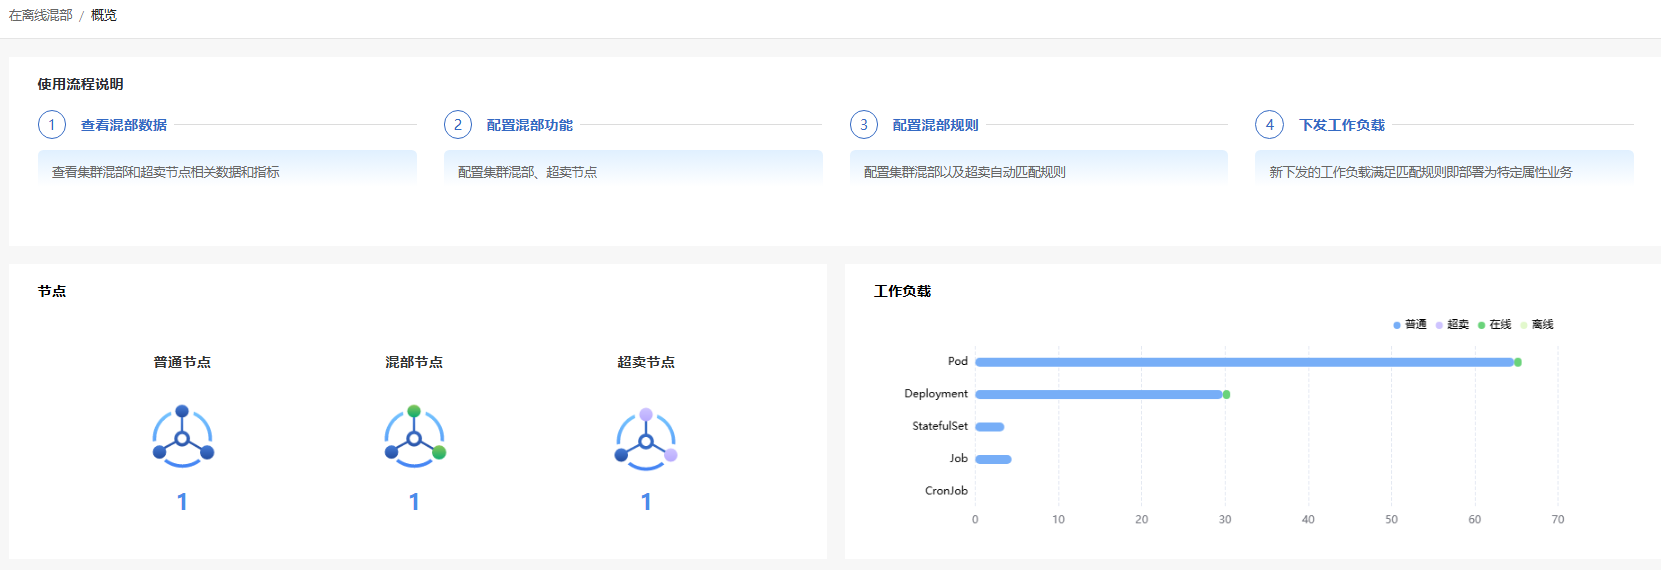
In the left navigation pane of the openFuyao platform, choose Computing Power Optimization Center > Colocation > Overview. The Overview page is displayed, which shows the usage process, node information, workload information, and node resource usage of colocation, as well as usage statistics of oversold resources on overselling nodes.
The statistics charts of top 5 oversold CPUs and memory resources in the resource statistics module are not displayed if no oversold node is set in the cluster. After a node in the cluster is set as an oversold node and the oversold agent is deployed on the node, the charts are displayed properly.
Figure 5 Colocation node management overview and list
Using Node Management
In the left navigation pane of the openFuyao platform, choose Computing Power Optimization Center > Colocation > Node Management. The Node Management page is displayed. This page displays the list of nodes related to colocation in the cluster, and enables colocation node management. In addition, you can set selected colocation nodes as oversold nodes.
Adding a Colocation Node
Prerequisites
At least one non-colocation node exists in the cluster.
Context
None.
Restrictions
Adding a colocation node may cause pods on the node to be evicted. Please properly plan the colocation capability of nodes in the cluster.
Procedure
-
On the Node Management page, click Add Colocation Node in the upper-right corner of the list. The Add Colocation Node window is displayed.
-
Select the nodes to support colocation.
NOTE- After a node is set as a colocation node, the workload on the node may be evicted and rescheduled, and the scheduling may fail. Before configuring colocation nodes, you are advised to properly plan node attributes and workload resources in the cluster.
- A dimmed node cannot be added as a colocation node.
-
Check whether to enable the node overselling function for the selected colocation nodes.
-
Click OK.
Related Operations
In the colocation node information list on the Node Management page, you can click the ![]() icon in the Set as Non-colocation Node column to remove the colocation node as required. You can also enable or disable the switch in the Set as Oversold column to set the colocation node as an overselling node as required.
icon in the Set as Non-colocation Node column to remove the colocation node as required. You can also enable or disable the switch in the Set as Oversold column to set the colocation node as an overselling node as required.
Using Workload Management
In the left navigation pane of the openFuyao platform, choose Computing Power Optimization Center > Colocation > Workload Management. The Workload Management page is displayed. The page displays five tab pages, Pod, Deployment, StatefulSet, Job, and CronJob, which are used to manage the online and offline attributes of the five types of colocation workloads, respectively. The following section describes the operations on the Pod tab page. The operations on the tab pages for other workloads are similar.
Figure 6 Colocation workload management
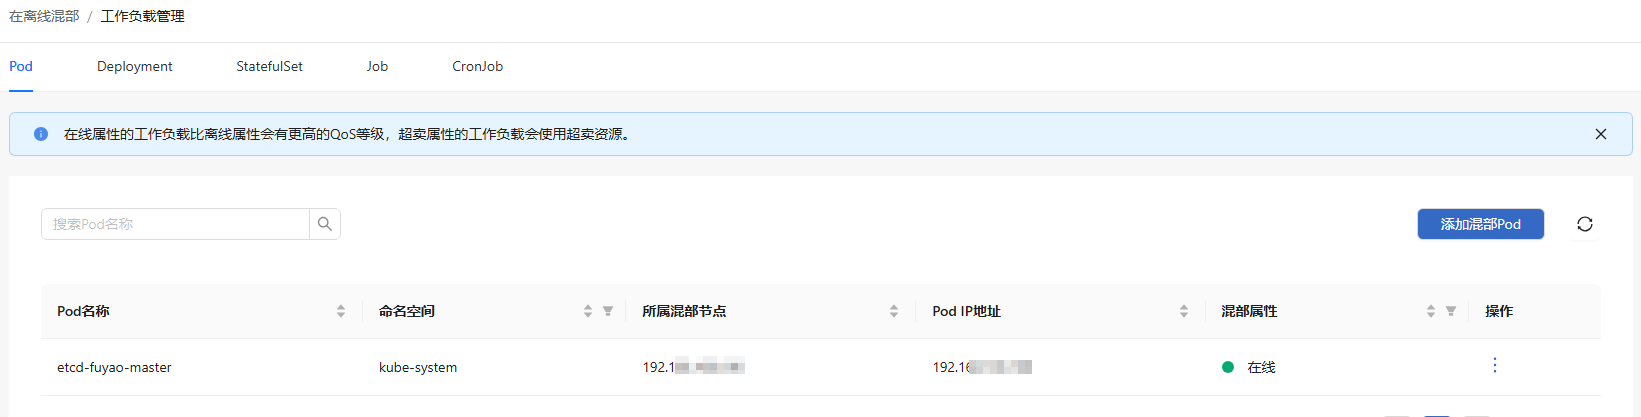
Viewing Colocation Pods
On the Pod tab, you can view all colocation pods in the current cluster, including offline colocation pods, colocation oversold pods, and online colocation pods.
- The Pod page lists only colocation pods, but not non-colocation pods. Pods with controllers are displayed in the list but are dimmed. To modify the pods, perform operations on the corresponding controller page.
- The viewing method on the Job page is the same as that on the Pod page.
Adding a Colocation Pod
Prerequisites
A non-colocation pod exists in the cluster.
Context
You can configure a non-colocation pod as an online or offline colocation pod to ensure the quality of online services and improve cluster resource utilization.
Restrictions
-
Rescheduling of workloads that are not managed by controllers, such as pods and Jobs, is not implemented in the current version. As a result, related resources may not be scheduled after colocation pods or Jobs are added. This situation does not occur in other workload types.
-
After a pod is set as an online or offline colocation workload, the pod will be evicted and redeployed on a colocation node. As a result, services provided by the pod will be unavailable for a short period of time. Exercise caution when performing this operation.
Procedure
- On the Workload Management page, click the Pod tab.
- In the upper-right corner of the Pod page, click Add Colocation Pod.
- Select the pod to be set as colocation and configure expected colocation attributes as required.
- Click OK.
Related Operations
You can click ![]() in the Operation column of the colocation workload list and choose Change to Offline or Set as Non-colocation as required.
in the Operation column of the colocation workload list and choose Change to Offline or Set as Non-colocation as required.
Currently, the colocation type of overselling workloads cannot be modified.
Using Rule Management
In the left navigation pane of the openFuyao platform, choose Computing Power Optimization Center > Colocation > Rule Management. The Rule Management page is displayed.
Figure 7 Colocation rule management
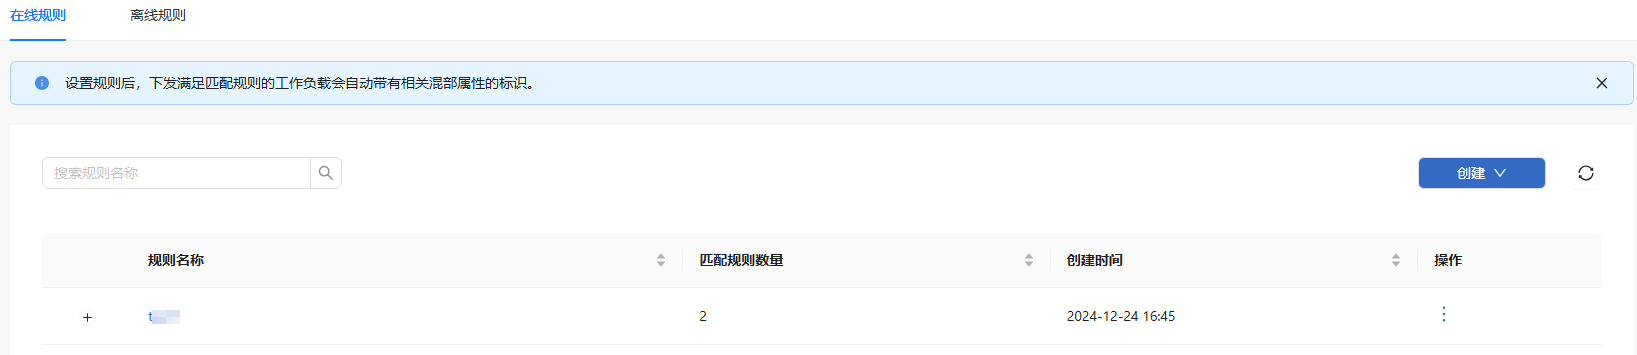
On the colocation rule management page, you can create, view, modify, and delete online and offline colocation rules. The current version does not support the configuration of overselling rules.
Creating a Colocation Rule
Colocation rules can be created in label selector mode or exact match mode. You can click Create in the upper-right corner of the Rule Management page and select a mode as required.
- A maximum of 100 colocation rules can be added.
- Creating a colocation rule does not affect the workloads that have been deployed. It takes effect only for workloads that are deployed after the rule is created.
- In label selector mode, a maximum of 10 labels can be created for each rule.
Table 1 Modes of colocation rule creation
| Mode | Description |
|---|---|
| Label selector mode | The colocation rule is automatically matched based on the specified information such as the label value of the target workload. |
| Exact match mode | The colocation rule is exactly and automatically matched based on the specified information such as the name of the target workload. |
Viewing Colocation Rules
Prerequisites
A colocation rule has been created.
Context
None.
Restrictions
None.
Procedure
-
In the left navigation pane, click Rule Management to view the rule list.
-
Click a rule name to view the details of the rule.
NOTE
The content of the rule cannot be modified on the colocation rule viewing page.
Related Operations
You can click ![]() in the Operation column on the list page to modify or delete the colocation rule as required.
in the Operation column on the list page to modify or delete the colocation rule as required.
| Operation | Description |
|---|---|
| Modification | You can modify attributes except the rule name and colocation attribute. |